Do you have a favorite fruit—one that transports you back in time with just a taste or scent? For me, that fruit is passion fruit. Its aroma carries me to distant, joyful moments, evoking a sense of nostalgia like no other.
I adore the crunch of its seeds, the perfect harmony of tangy, sour, and sweet. A single teaspoon of passion fruit pulp can transform an ordinary beverage into something extraordinary, turning a mundane sip into a cherished memory.
One of my most treasured possessions is a cookbook passed down from my mom, titled The New Guinea Cookbook. Its timeworn pages, typed in Courier font, hold a treasure trove of recipes—everything from Baked Breadfruit to this simple yet evocative recipe for Passion Fruit Drink.
PASSION FRUIT DRINK Add lemon juice, sugar and ice water to sieved passion fruit for a refreshing drink.
Below is my version of this simple recipe.
What food brings with it waves of memories for you?
Recipe: Passion Fruit Lemonade
Makes: 10 8-ounce servings
Ingredients:
2½ cups water
1¼ cups sugar
½ teaspoon lemon peel, finely shredded
1¼ cups lemon juice (about 4 lemons, depending on their size)
6 passion fruit, pulp scooped out
1 lemon, thinly sliced
Water
Ice
Instructions:
In a medium saucepan, heat water and sugar until sugar dissolves. Remove from heat and cool.
Add lemon peel, lemon juice and passion fruit pulp to sugar syrup. Cover and refrigerate. (Base can be stored in the refrigerator up to 3 days.)
For each serving, pour ½ cup base into a glass. Stir in ½ cup water. Fill the glass with ice and garnish with a lemon slice.
If desired, you can strain the passion fruit pulp to remove the seeds.
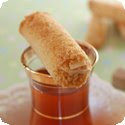
Are crêpes making a comeback? Judging by my recent encounter with Lemon Sugar Crêpes at a Seattle food cart called Anita’s Crêpes, I’d say yes. The experience was unforgettable—fresh lemon juice squeezed over a perfectly cooked crêpe, sprinkled with sugar, and then brûléed with a torch. A dollop of whipped cream sealed the deal. Absolute heaven!
This week, I decided to step up my crêpe game with Crêpes Soufflées au Cointreau—souffléed crêpes flamed with Cointreau. While I adore crêpes, I’ve never been a fan of pastry cream. But I couldn’t resist the challenge of combining it with a flambé finish.
Recipe: Crêpes Soufflées au Cointreau (Souffléed Crêpes Flamed with Cointreau)
Serves: 6
Ingredients:
Sweet Crêpe Batter
1 cup all-purpose flour
2 eggs
Pinch salt
2 tablespoons sugar
1 cup milk
5 tablespoons unsalted butter, melted
Grated zest of 1 orange
Pastry Cream
1 cup milk
1 teaspoon vanilla extract
2 egg yolks
1/3 cup sugar
2 tablespoons all-purpose flour
2 tablespoons cornstarch
¼ cup Cointreau plus 3 tablespoons for flaming the crêpes
1 egg, separated
3 egg whites
Confectioner’s sugar for dusting
Unsalted butter, melted, for crêpe pan
Instructions:
1. Make the Crêpe Batter
Blend all the ingredients until smooth. Let the batter rest for 30 minutes.
2. Prepare the Pastry Cream
Heat milk and vanilla until boiling.
In a separate bowl, whisk egg yolks with sugar, then add flour and cornstarch.
Slowly pour the hot milk into the egg mixture while whisking. Return to the stove and cook until thickened. Let cool.
3. Assemble the Soufflé Mixture
Whisk 3 egg whites until stiff peaks form. Fold them gently into the cooled pastry cream.
4. Cook the Crêpes
Heat a crêpe pan with melted butter. Cook each crêpe until golden on both sides. Set aside.
5. Fill and Bake
Preheat oven to 350°F.
Spread the soufflé mixture onto each crêpe, fold, and place on a baking sheet. Bake for 15 minutes until golden and puffed.
6. Flambé the Crêpes
Heat 3 tablespoons of Cointreau in a saucepan. Light with a match and pour over the crêpes once the flame subsides.
You can find the recipe for Crêpes Soufflées au Cointreau (Souffléed Crêpes Flamed with Cointreau) in the book Le
Cordon Bleu at Home (affiliate link) or here.
Tasting Notes
I love anything wrapped in a crêpe. By baking these in the oven for 15 minutes, they were crispy and even tastier. My imagination is going crazy thinking of the combinations I could put inside the crêpe instead of the pastry cream. Plus this could be an easy make-ahead dessert since the crêpes can be made early and stored between sheets of waxed paper.
Next Time
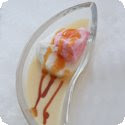
Crème anglaise in Oeufs à la Neige (Snow Eggs with Caramel and Crème Anglaise) on page 51
::Whisk::
I'm baking my way through a cooking school curriculum using the Le Cordon Bleu at Home (affiliate link) cookbook The "classes" are based on the Le Cordon Bleu curriculum found online and used as a guideline. Not all the items in the curriculum are in the cookbook, but most are. Where the items are not in the book, I try to find a suitable substitution.
The Charlotte Malakoff is a dessert steeped in history, celebrating the French capture of a Ukrainian town in 1855. While war is never worth celebrating, a rich dessert like this certainly is! With its fortress of ladyfingers encasing a kirsch-infused almond cream, topped with Chantilly cream and fresh berries, this French classic is both indulgent and celebratory.
Creating this dessert is an adventure that doesn’t demand perfection, as I quickly discovered. Despite my own deviations from the recipe, the result was delightful—a reminder that even kitchen mishaps can lead to sweet victories.
My first defeat was with the ladyfingers. Instead of saving the confectioner’s sugar to sprinkle on the piped fingers, I whisked both sugars with the egg whites and then folded in the yolks and flour. But I claim this as a victory since the ladyfingers survived and actually tasted yummy.
Without trouble, I whisked all the syrup ingredients together.
But the almond cream took a beating. Everything was going well at first. I softened the butter in the stand mixer and added the confectioner’s sugar, ground almonds and kirsch. But at this point, I forgot that I needed another ¾ cup of cream that was to be whisked to whipped cream status. Instead I proceeded to make the Chantilly cream and folded that in. So my almond cream had some extra vanilla and sweetness.
I admitted utter defeat when attempting to assemble this Malakoff. I dipped the cut ends of my less-than-perfect ladyfingers into the syrup and formed my weak fortress. I piped in my rogue almond cream (using a Ziploc bag and a fancy tip) and put it in the fridge where I hoped some magic would turn my unsightly Charlotte into a princess.
I surrender.
Recipe: Charlotte Malakoff (Almond Cream Charlotte)
Serves: 6
Ingredients:
Ladyfingers
3 eggs, separated
6 tablespoons granulated sugar
¾ cup cake flour, sifted
6 tablespoons confectioner’s sugar
Sugar Syrup
2 tablespoons cold water
2 tablespoons kirsch
2 tablespoons confectioner’s sugar
Almond Cream
¼ pound unsalted butter
½ cup confectioner’s sugar
4 oz finely ground almonds (about 1 cup)
3 tablespoons kirsch
¾ cup heavy cream
Chantilly Cream
¾ cup heavy cream
1 teaspoon vanilla extract
1 tablespoon confectioner’s sugar
Instructions:
1. Make the Ladyfingers:
Preheat your oven to 350°F.
Whisk egg whites until stiff peaks form, gradually adding granulated sugar.
Fold in the egg yolks and sifted cake flour gently.
Pipe the batter into ladyfinger shapes on a parchment-lined baking sheet.
Dust with confectioner’s sugar and bake for 10–12 minutes or until golden.
2. Prepare the Sugar Syrup:
Whisk together water, kirsch, and confectioner’s sugar until dissolved.
3. Make the Almond Cream:
Cream butter with confectioner’s sugar in a mixer.
Add ground almonds and kirsch, mixing until smooth.
Whip the heavy cream to stiff peaks and gently fold it into the almond mixture.
4. Prepare the Chantilly Cream;
Whisk heavy cream, vanilla, and confectioner’s sugar until soft peaks form.
5. Assemble the Charlotte:
Dip the cut ends of the ladyfingers in the sugar syrup.
Line a mold with the ladyfingers to form a “fortress.”
Pipe in the almond cream, smoothing the surface.
Chill for at least 2 hours.
Top with Chantilly cream and fresh berries before serving.
You can find the recipe for Charlotte Malakoff (Almond Cream Charlotte) in the book Le
Cordon Bleu at Home (affiliate link).
Tasting Notes
A bit boozy, so next time I would half the kirsch or leave it out. This dessert is definitely best with fresh berries to cut the richness, but the ladyfingers are charming.
Next Time
Crème pâtissière (Pastry cream) in Crêpes Soufflées au Cointreau (Souffléed Crêpes Flamed with Cointreau) page 182
::Whisk::
I'm baking my way through a cooking school curriculum using the Le
Cordon Bleu at Home (affiliate link) cookbook. The "classes" are based on the Le Cordon Bleu curriculum found online and used as a guideline. Not all the items in the curriculum are in the cookbook, but most are. Where the items are not in the book, I try to find a suitable substitution.
Clafoutis Normand is a delightful French dessert that blends the simplicity of baked custard with the richness of apples and cream. While purists might argue it should be called a "flaugnarde" since it doesn't feature cherries, this Normandy-inspired variation holds its own with buttery baked apples and a hint of Calvados (if you fancy). Whether you choose to make it with a flaky crust or as a crustless custard, this dessert is both elegant and comforting.
Recipe: Clafoutis Normand (Apple and Cream Tart)
Serves: 6
Ingredients:
Pâté Brisée Sucrée
1 cup all-purpose flour
½ cup cake flour
1 egg
1 tablespoon water
Pinch salt
3 tablespoons sugar
1 teaspoon vanilla extract
7 tablespoons unsalted butter, cut into pieces
1 egg, lightly beaten, for glazing
Baked Apples
3 apples (preferably Golden Delicious)
1 lemon, halved
4 tablespoons butter, melted
1 tablespoon Calvados (I left this out)
1 tablespoon sugar
Custard
1 egg yolk
2 eggs
¼ cup sugar
1 ounce fine-ground almonds (about ¼ cup)
1 teaspoon vanilla extract
2/3 cup crème fraîche or heavy cream
Instructions:
1. Prepare the Pastry (Optional):
Combine the flours, salt, sugar, and butter in a food processor. Pulse until crumbly.
Add the egg, water, and vanilla. Blend until the dough comes together.
Roll out the pastry and line a tart pan. Chill for 30 minutes. Pre-bake at 375°F for 10 minutes.
2. Bake the Apples:
Peel, core, and slice the apples. Rub with lemon to prevent browning.
Toss the slices with melted butter, sugar, and Calvados (if using).
Arrange on a baking sheet and bake at 375°F until golden and tender (about 15 minutes).
3. Make the Custard:
Whisk together the egg yolk, eggs, sugar, almonds, vanilla, and cream.
4. Assemble and Bake:
If using pastry, line the pre-baked tart shell with the baked apples. For a crustless version, layer the apples in a greased baking dish.
Pour the custard mixture over the apples.
Bake at 375°F for 25–30 minutes, or until the custard is set and a knife comes out clean.
You can find the recipe for Clafoutis Normand (Apple and Cream Tart) in the book Le
Cordon Bleu at Home (affiliate link).
Tasting Notes
I love pudding, so this dessert is in my "make-again" pile. I made it both with a pie crust and without (since I ran out of leftover pastry). The crust gave it some texture, but I prefer the baked custard version, even though it was a touch darker than it should have been.
Next Time
Crème chantilly, Crème pâtissière, Crème anglaise, Crème bavaroise
(Whipped cream, pastry cream, Bavarian cream)
::Whisk::
I'm baking my way through a cooking school curriculum using the Le Cordon Bleu at Home (affiliate link) cookbook. The "classes" are based on the Le Cordon Bleu curriculum found online and used as a guideline. Not all the items in the curriculum are in the cookbook, but most are. Where the items are not in the book, I try to find a suitable substitution.
Tartelettes aux Fraises, or Strawberry Tartlets, are a delightful celebration of simplicity and freshness. Combining a buttery pie crust, lightly sweetened Chantilly cream, and ripe, juicy strawberries, this dessert is perfect for summer. With strawberry season in full swing, it’s the ideal treat to showcase the flavor of fresh-picked berries.
It's strawberry season in Ottawa, so I walked over to the fields by my house to the local "pick your own" farm and pinched off fresh, sun-kissed red strawberries. I used the leftover pastry from last week's Tarte aux Agrumes (Citrus Tart). A quick whisk of whipping cream, and this dessert was ready.
Recipe: Tartelettes aux Fraises (Strawberry Tartlets)
Serves: 6
Ingredients:
Pâté Brisée Sucrée
1 cup all-purpose flour
½ cup cake flour
1 egg
1 tablespoon water
Pinch salt
3 tablespoons sugar
1 teaspoon vanilla extract
7 tablespoons unsalted butter, cut into pieces
1 egg, lightly beaten, for glazing
1 ½ pint basket of strawberries
Raspberry Glaze
6 ounces raspberry jam (a generous ½ cup)
1 tablespoon kirsch (I left this out)
Chantilly Cream
1 ¼ cups heavy cream
¼ cup confectioner’s sugar
1 teaspoon vanilla extract
Instructions:
1. Prepare the Pastry:
Combine flours, salt, sugar, and butter in a food processor. Pulse until crumbly.
Add egg, water, and vanilla. Blend until the dough forms.
Roll out and cut into small circles to fit tartlet pans. Chill for 30 minutes.
Pre-bake at 375°F for 10–12 minutes until golden. Let cool.
2. Prepare the Glaze:
Warm the raspberry jam in a small saucepan. Add kirsch (if using) and mix until smooth.
3. Whip the Chantilly Cream:
In a chilled bowl, whisk together the heavy cream, confectioner’s sugar, and vanilla extract until soft peaks form.
4. Assemble the Tartlets:
Spread a thin layer of Chantilly cream over the cooled tartlet shells.
Arrange strawberries on top.
Lightly brush the strawberries with the raspberry glaze for a glossy finish.
You can find the recipe for Tartelettes aux Fraises (Strawberry Tartlets) in the book Le
Cordon Bleu at Home (affiliate link).
Tasting Notes
Tartelettes aux Fraises are a crowd-pleaser. They combine the crunch of buttery pastry with the lightness of whipped cream and the natural sweetness of strawberries. Similar to a strawberry shortcake, these tartlets elevate the experience with their elegant presentation and fruity glaze.
I'm baking my way through a cooking school curriculum using the Le
Cordon Bleu at Home (affiliate link) cookbook The "classes" are based on the Le Cordon Bleu curriculum found online and used as a guideline. Not all the items in the curriculum are in the cookbook, but most are. Where the items are not in the book, I try to find a suitable substitution.
The Tarte aux Agrumes, or Citrus Tart, is a bright and refreshing dessert that highlights the natural sweetness and tang of oranges and lemons. While its components—pâté brisée sucrée, citrus pastry cream, macerated fruit, and a citrus glaze—may sound daunting, each step is manageable when taken one at a time.
I've always had trouble with pie crusts (or pâté brisée sucrée if you want to be all French about it). But this crust came together easily for me. I didn't use the traditional method of putting the ingredients on the counter, making a well and "fraisage-ing" the dough. I used my food processor, threw all the ingredients in and whizzed until the dough formed a ball. So much simpler, and it was my best crust yet.
This tart (a pie has a crust on top and bottom, but a tart just has the bottom crust) is composed of orange pastry cream and macerated slices of orange and lemon.
Why Do Fruits Retain Shape in Sugared Water? Osmotic pressure! When cooking fruit in plain water, the sugars inside the fruit cells want to escape, causing the fruit to break down. Adding sugar to the cooking liquid equalizes the pressure and helps the fruit retain its structure. (Michael at Herbivoracious)
Recipe: Tarte aux Agrumes (Citrus Tart)
Serves: 6
Ingredients:
Citrus
1½ cups sugar
1½ cups water
2 teaspoons vanilla extract
2 small oranges, unpeeled and sliced thin
2 lemons, unpeeled and sliced thin
Pâté Brisée Sucrée
1 cup all-purpose flour
½ cup cake flour
1 egg
1 tablespoon water
Pinch salt
3 tablespoons sugar
1 teaspoon vanilla extract
7 tablespoons unsalted butter, cut into pieces
1 egg, lightly beaten, for glazing
Orange Pastry Cream
1 cup orange juice, strained
3 egg yolks
3 tablespoons sugar
1 tablespoon all-purpose flour
1 tablespoon cornstarch
1 tablespoon Cointreau (I left this out)
Orange Glaze
Juice of 3 oranges, strained
½ cup apricot jam or jelly, strained
Fresh mint for garnish
Instructions:
1. Prepare the Citrus in Syrup:
Combine sugar, water, and vanilla in a saucepan. Bring to a boil.
Add citrus slices and simmer for 10–15 minutes until translucent. Drain and set aside.
2. Make the Pastry:
Combine all pastry ingredients in a food processor. Pulse until the dough forms a ball.
Roll out dough, fit into a tart pan, and chill for 30 minutes.
Pre-bake the crust at 375°F for 12–15 minutes until golden. Let cool.
3. Cook the Orange Pastry Cream:
Whisk egg yolks, sugar, flour, and cornstarch in a bowl until smooth.
Heat orange juice in a saucepan until warm but not boiling. Slowly whisk into the egg mixture.
Return to the saucepan and cook over medium heat, whisking constantly, until thickened. Let cool.
4. Prepare the Glaze:
Simmer orange juice and apricot jam until reduced and syrupy. Strain if necessary.
5. Assemble the Tart:
Spread the cooled pastry cream into the tart shell.
Arrange citrus slices on top.
Brush with the orange glaze and garnish with fresh mint.
You can find the recipe for Tarte aux Agrumes (Citrus Tart) in the book Le
Cordon Bleu at Home (affiliate link).
Tasting Notes
This tart offers a balance of sweet and tangy flavors, with the macerated citrus slices adding a slight bitterness that complements the creamy pastry cream. While I’m not typically a fan of pastry cream, the orange version in this recipe is smooth and refreshing. However, the buttery and tender crust is what truly stood out—it was my best yet!
Next Time
Tartelettes aux Fraises (Strawberry Tartlets) page 504
::Whisk::
I'm baking my way through a cooking school curriculum using the Le
Cordon Bleu at Home (affiliate link) cookbook The "classes" are based on the Le Cordon Bleu curriculum found online and used as a guideline. Not all the items in the curriculum are in the cookbook, but most are. Where the items are not in the book, I try to find a suitable substitution.
Dacquoise—it may sound fancy, but it’s simply a delightful nut-based meringue dessert that can be adapted in countless ways. Whether you aim for soft, cakey layers or crisp, Pavlova-like textures, this versatile recipe is a gateway to dessert creativity.
It’s time for sweetness and whisking up a Dacquoise, which sounds all fancy schmancy but not when you spell it like this: DAH-KWAH! And though the ingredient list is simple and short, I know from experience that those recipes are the hardest to pull off. So I did some research and found this video that shows the technique.
Distracted by the caster sugar in the recipe (also known as superfine sugar), I googled images for caster shakers and found an assortment of antique, modern, and art deco containers that are now on my wish list. (One was even selling for $1139 on eBay.) I already own a variety of shakers, but you can never have too many beautiful things to hold something sweet.
“fruiter di una torta di noci”
("fruitier than a nutcake" which is a bad translation of "nuttier than a fruitcake")
Back to the recipe. The first step is to make a meringue (egg whites and sugar) and whisk until soft peaks form. Soft, firm, stiff. The difference can only be seen, and Kitchn has a visual guide and descriptions to help in that area.
"Soft Peak - When you turn your whisk upside down, the peaks are just starting to hold. They're soft and melt back into themselves after a second." ~Kitchn
Folding in the ground almonds, icing sugar and flour is more fun with your hands.
Finally, it’s time to dust off the piping bag and with one of the larger tips, pipe it into a fun shape. {I used my round egg shaper!} Bake “until done”, as a chef at LCB would say. How long depends on your oven, the temperature you use, and how big the shape of your dacquoise is. Sometimes, your dacquoise may turn out cakey and other times more crispy like Pavlova. I’m aiming for cakey.
After that, it’s up to your imagination how you want to dress it up.
"If you use chocolate buttercream and chocolate ganache, it's a marquise. If you use hazelnuts in the meringues and bake them in rectangles, with chocolate buttercream and ganache, it's a marjolaine." ~BondC
You can also use other nut meal for variety. Mmmm hazelnuts, chestnuts, pine nuts...
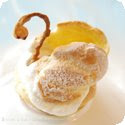
Recipe: Spiced Pear Dacquoise with Chocolate and Red Wine Sauce
Serves: 6
Clockwise from top: Dacquoise, Spiced Pears, Chocolate and Red Wine Sauce, Ganache
Ingredients:
Dacquoise
4 egg whites
50 g caster sugar
70 g ground almonds, sifted
75 g icing sugar, sifted
30 g flour, sifted
Ganache
90 g bitter chocolate (55 to 70% cocoa)
100 ml double cream
15 g honey of neutral flavour
35 g unsalted butter, softened
Spiced Pears
6 pears
½ lemon
30 g unsalted butter
40 g honey of neutral flavour
ground cinnamon
cloves
ground nutmeg
freshly ground black pepper
Chocolate and Red Wine Sauce
100 g chocolate
½ bottle red wine
3 star anise
20 ml water, only if necessary
30 g caster sugar
Instructions:
1. Make the Dacquoise:
Whisk egg whites until soft peaks form. Gradually add caster sugar, whisking until stiff peaks form.
Gently fold in ground almonds, icing sugar, and flour using a spatula or your hands.
Pipe into desired shapes using a piping bag with a large round tip.
Bake at 325°F (160°C) until lightly golden and set. Baking time varies based on the size and shape, but check after 20 minutes.
2. Prepare the Ganache:
Heat cream and honey until just boiling.
Pour over chopped chocolate, let sit for 1–2 minutes, then stir until smooth.
Add softened butter and mix until glossy. Set aside to cool.
3. Poach the Spiced Pears:
Peel pears, halving or quartering them as desired. Squeeze lemon juice over to prevent browning.
Melt butter in a skillet, add honey, and heat until bubbling.
Add pears, spices, and a touch of water if needed. Cook until tender and caramelized, about 10–15 minutes.
4. Make the Chocolate and Red Wine Sauce:
Simmer red wine with star anise and sugar until reduced by half.
Stir in chocolate until melted. Add water to adjust consistency if necessary.
5. Assemble the Dessert:
Layer or stack Dacquoise rounds with ganache and poached pears.
Drizzle with the chocolate and red wine sauce.
You can find the recipe for Spiced Pear Dacquoise with Chocolate and Red Wine Saucehere.
Tasting Notes The Dacquoise, with its nutty, meringue-like texture, acts as the perfect base for the rich chocolate ganache and spiced pears. The red wine sauce adds a sophisticated, slightly tangy note that ties everything together. While the components are delicious individually, their harmony is what elevates this dessert.
Next Time
Tarte aux Agrumes (Citrus Tart) in Le Cordon Bleu at Home cookbook (page 102)
::Whisk::
I'm baking my way through a cooking school curriculum using the Le
Cordon Bleu at Home (affiliate link) cookbook The "classes" are based on the Le Cordon Bleu curriculum found online and used as a guideline. Not all the items in the curriculum are in the cookbook, but most are. Where the items are not in the book, I try to find a suitable substitution.
Peanut Stew is a warm, comforting dish perfect for cozy evenings. Its creamy texture, thanks to peanut butter, paired with a subtle kick from curry powder and red pepper flakes, makes it a flavorful, satisfying meal. Whether you keep it vegetarian or pour it over chicken, this stew is versatile and easy to adapt.
1½ teaspoons peanut oil
1 cup medium yellow onion, diced
2 cloves garlic, minced
2 teaspoons curry powder
½ teaspoon ground coriander
1 28-ounce can crushed tomatoes
½ teaspoon salt
⅛ tsp crushed red pepper flakes
⅛ tsp Tabasco or other hot pepper sauce
2 tablespoons peanut butter
¼ cup unsalted roasted peanuts, coarsely chopped
salt
Instructions:
Sauté Aromatics Heat peanut oil in a heavy-bottomed pot over medium heat. Add the onions and sauté until translucent, about 8–10 minutes. Add the minced garlic and cook for an additional minute.
Toast Spices Stir in the curry powder and ground coriander, cooking for about 1 minute to release their aroma.
Simmer the Base Add the crushed tomatoes, salt, red pepper flakes, and Tabasco sauce. Stir well, cover, and simmer over low heat for 15 minutes.
Add the Peanut Flavor Stir in the peanut butter and chopped roasted peanuts. Let the stew cook for an additional 5 minutes, stirring occasionally.
Serve Serve hot over chicken, pasta, polenta, or rice. Pair it with a fresh salad for a complete meal.
Variations:
Toast the Peanuts: Toasting peanuts before adding them enhances their flavor and adds a smoky depth to the stew.
Add Protein: Keep it vegetarian or incorporate cooked chicken, chickpeas, or tofu for extra protein.
Alternative Nuts: Swap peanuts for cashews or almonds for a different nutty flavor.
Spice It Up: Adjust the level of heat by increasing the red pepper flakes or Tabasco sauce to your preference.
Tasting Notes The combination of warm spices and creamy peanut butter creates a unique, addictive flavor. The roasted peanuts add a delightful crunch, making this dish a textural treat. For a twist, try cashews instead of peanuts or experiment with different spice blends to suit your palate.
Brunch is one of my favorite meals—a time to slow down, enjoy good food, and maybe even indulge in a sweet treat like pancakes. This Mother's Day, we plan to head out to the sugar bush for some maple syrup goodness, even though we’re missing the prime maple syrup season. Wheeler's Pancake House, located just outside of Perth, Ontario, is my go-to place for a delicious breakfast. While I love their pancakes, it's their maple sausages that keep me coming back for more. I only wish I had the recipe for their signature sausages!
But if you can't make it to Wheeler’s, these Spicy Pumpkin Pancakes will do the trick. They bring warmth, flavour, and the rich taste of pumpkin to your brunch table. They pair perfectly with a drizzle of maple syrup—my personal favorite.
Recipe: Spicy Pumpkin Pancakes
Makes: 9 4-inch pancakes
Ingredients:
2 cups all-purpose flour
2 tablespoons brown sugar
1 tablespoon baking powder
1 teaspoon salt
1 teaspoon ground cinnamon
½ teaspoon ground nutmeg
¼ teaspoon ground ginger
1¾ cups milk
½ cup pumpkin purée
1 large egg
2 tablespoons vegetable oil
maple syrup
Instructions:
Mix Dry Ingredients: In a large bowl, whisk together the flour, brown sugar, baking powder, salt, cinnamon, nutmeg, and ginger.
Combine Wet Ingredients: In a separate bowl, whisk together the milk, pumpkin purée, egg, and vegetable oil.
Make the Pancake Batter: Add the wet ingredients to the dry ingredients and stir until the batter is smooth.
Cook the Pancakes: Heat a nonstick griddle or skillet over medium heat and spray it lightly with cooking spray. Spoon about ¼ cup of batter onto the griddle for each pancake. Cook until the tops are covered with bubbles and the edges look cooked. Flip the pancakes and cook for another minute or two on the other side.
Serve: Serve your spicy pumpkin pancakes hot, with a generous drizzle of maple syrup. Enjoy!
Variations:
Add-Ins: For extra flavor, toss in some chopped nuts, such as walnuts or pecans, or add a handful of chocolate chips to the batter.
For Fluffier Pancakes: Let the batter rest for 5 minutes before cooking, allowing the baking powder to activate and make the pancakes even fluffier.
Topping Ideas: Serve with whipped cream, butter, or a sprinkle of cinnamon sugar for an extra special touch.
Tasting Notes These pancakes are soft, fluffy, and bursting with warm fall spices. The pumpkin purée adds a subtle sweetness and moist texture, making them the perfect treat for a cozy brunch. The spices give them a kick, and the maple syrup ties it all together.
Happy Mother's Day!
I know why the caged bird sings
A free bird leaps on the back of the wind
and floats downstream till the current ends
and dips his wing in the orange suns rays and dares to claim the sky.
But a bird that stalks down his narrow cage
can seldom see through his bars of rage
his wings are clipped and his feet are tied so he opens his throat to sing.
The caged bird sings with a fearful trill
of things unknown but longed for still
and his tune is heard on the distant hill
for the caged bird sings of freedom.
The free bird thinks of another breeze
and the trade winds soft through the sighing trees
and the fat worms waiting on a dawn-bright lawn and he names the sky his own.
But a caged bird stands on the grave of dreams
his shadow shouts on a nightmare scream
his wings are clipped and his feet are tied so he opens his throat to sing.
The caged bird sings with a fearful trill
of things unknown but longed for still
and his tune is heard on the distant hill
for the caged bird sings of freedom.
A cool new magazine has just hit the market! Taste & Travel International is hot-off-the-press and available at Chapters bookstores across Canada.
Credit for launching this new magazine goes to the publisher, Janet Boileau, who identifies culinary tourism as one of the fastest-growing sectors in the travel industry. Assembling a stellar, international line-up of writers, photographers, cooks, and recipe developers, she has put together a classy, glossy, informative, and inspiring launch issue with close to 100 pages of solid content to inspire those who love to cook, those who have a palate for delectable food, and those who have a passion for travel.
This first issue introduces a feature article on Canada’s Epicurean Inns, written by Anita Stewart who tours Canada’s foremost culinary lodges and interviews the chefs who are creating world-class menus using seasonal local ingredients. From the Rossmount Country Inn in New Brunswick on the east coast of Canada to the Wickanninish Inn in Tofino, B.C. on the west coast of Canada, Stewart has managed to wrestle signature recipes from each one of the chefs which she shares with Taste & Travel readers. This inaugural issue also features the first in a four-part series on seasonal Japanese cooking by Elizabeth Andoh. Throughout the magazine, interwoven with stories of travel, are intriguing, clip-out recipes.
“Food and travel are a lifetime pairing for many of us . . . and a life-time pleasure.”
- Naomi Duguid, award winning culinary travel writer
Kudos to Janet Boileau for having the vision to transform the dream of this magazine into a reality. Janet has a Master of Arts in Gastronomy from Le Cordon Bleu, a PhD in culinary history from the University of Adelaide in South Australia, and has a solid background in magazine publishing. She's written articles for and traveled with David Leite from Leite's Culinaria and has befriended many well-known celebrities in the food world.
I am pleased to be part of this inspiring new endeavor as the Food Editor. It was exciting to tackle new recipes and photograph exotic dishes I’d never experimented with before. {I highly recommend buying the issue just for the Enchiladas Suizas on page 80.}
Taste & Travel International sells for $6.95CAD at Chapters stores across Canada and will soon be available internationally. It will be published quarterly. Subscriptions are $25.00 for four issues and can be ordered from: distribution@TasteAndTravelMagazine.com or here. Soon, this magazine will be available internationally through Zinio, a service that transforms print magazines into digital format.
Thank you Dorie (@DorieGreenspan) for mentioning my variation on your cake as one of your favorites to the people at O (Oprah!) magazine. What an honor. Dorie is an inspiration who takes the time to respond and encourage people to follow their passion. I have several of Dorie's cookbooks, and
Top 15 Treats from Tuesdays with Dorie
Here are my top 15 favorite recipes from the Tuesdays with Dorie treats I made:
When dining out, I always find myself hoping for a dessert menu that offers something a little different from the usual suspects: crème brûlée, cheesecake, pie, or chocolate. I tend to gravitate towards the more indulgent options like Napoleons, Bananas Foster, or Sticky Toffee Pudding. This dessert is one of my all-time favorites—rich, moist, and decadent with a gorgeous warm sauce. If you haven’t tried it yet, here’s a recipe to help you make this comforting dessert at home.
Recipe: Sticky Toffee Pudding
Makes: 1 8x8 pan or 6 individual pans
Ingredients:
1¼ cup water
1 cup dates
1 teaspoon vanilla
¼ cup butter
¾ cup brown sugar
2 eggs
1⅓ cup flour
¾ teaspoon baking powder
½ teaspoon baking soda
⅓ cup raisins
½ cup pecans, chopped
Instructions:
Preheat the Oven: Preheat your oven to 350°F (175°C). Prepare the baking pans by spraying them with non-stick spray and lining them with parchment paper. Rub the parchment paper with butter to ensure easy removal later.
Simmer the Dates: In a small saucepan, bring the water to a simmer. Add the dates and vanilla and let them simmer for about 5 minutes. Remove from heat and let cool.
Make the Cake Batter: Cream the butter and brown sugar together in a large bowl until light and fluffy. Add the cooled date mixture to the creamed butter and sugar. Add the eggs one at a time, beating well after each addition.
Combine Dry Ingredients: In a separate bowl, whisk together the flour, baking powder, and baking soda. Gradually add this mixture to the wet ingredients, stirring until combined.
Puree the Mixture: For a slightly chunky consistency, puree the mixture in a food processor until smooth but still with some texture. Let it cool for a few minutes.
Add Raisins and Pecans: Once the mixture has cooled slightly, fold in the raisins and chopped pecans.
Bake the Pudding: Pour the batter into the prepared pan(s) and bake for about 30 minutes or until a cake tester or toothpick inserted into the center comes out clean.
Serve: Once baked, serve warm with your choice of butterscotch sauce, crème anglaise, whipped cream, or ice cream. For an extra touch, dust the top with a little icing sugar.
Variations:
Sauce: If you’re looking to make it even more indulgent, drizzle extra butterscotch sauce on top or try a homemade caramel sauce for a change.
Add a Twist: Swap the pecans for walnuts, or try adding a hint of cinnamon or ginger for extra warmth.
Freezing: This pudding can be frozen after baking and reheated in the microwave for a quick and easy treat.
Tasting Notes Sticky toffee pudding is rich, moist, and bursting with deep date flavor. The raisins and pecans add little bursts of sweetness and crunch, while the butterscotch sauce or creaminess of the crème anglaise makes the whole dessert wonderfully indulgent. It’s the kind of dessert you’ll want to dive into after a long day.