Showing posts with label Fall. Show all posts

Monday, October 26, 2009

Beef Dip

Beef Dip

Beef Dip is a hearty and delicious dish that’s perfect for gatherings, weeknight dinners, or whenever you’re craving tender roast beef with savory dipping sauce. The secret? A humble package of onion soup mix adds incredible flavor with minimal effort. (Shh...don't tell the chefs at Le Cordon Bleu! They would want you to make French Onion Soup from scratch and dehydrate it yourself!)

Serve with crusty French bread for the ultimate comfort meal.

Recipe: Beef Dip

from Auntie Joyce

Serves: 8

Ingredients:

4-pound beef roast
1 teaspoon dry mustard
½ teaspoon dried oregano
Salt and freshly ground black pepper
2 tablespoons vegetable oil
2 yellow onions, cut into slices or rings
5 cups water
½ cup soya sauce
1 package onion soup mix
1 garlic clove, minced

Insructions:

To Prepare and Eat Now:

  1. Preheat your oven to 325°F (163°C).
  2. Pat the roast dry with paper towels. Rub or sprinkle it with dry mustard, oregano, salt, and pepper.
  3. In a large roasting pan, heat vegetable oil over medium-high heat. Sear the roast on all sides until browned. Set aside.
  4. Add sliced onions to the roasting pan and sauté until tender, about 10 minutes.
  5. Pour in water, soy sauce, onion soup mix, and minced garlic. Stir to combine. Return the roast to the pan.
  6. Roast in the oven for 2-2½ hours or until the beef reaches your desired doneness:

    Extra-rare (bleu)115-120°F (46-49°C)
    Rare125-130°F (52-55°C)
    Medium rare130-140°F (55-60°C)
    Medium140-150°F (60-65°C)
    Medium well150-155°F (65-69°C)
    Well done>160°F (>71°C)

To Freeze:

  1. Cook the roast to a slightly lower temperature than desired, allowing it to finish cooking when reheated.
  2. Slice the beef and layer it between sheets of wax paper.
  3. Freeze the roast and sauce in separate containers. Recommended freezing time: 6-12 months.

To Prepare After Freezing:

  1. Thaw overnight in the refrigerator.
  2. Reheat the beef slices and sauce in the microwave or on the stovetop.
Beef Dip


Thursday, October 15, 2009

Orange Pumpkin Loaf

Orange Pumpkin Loaf

This Orange Pumpkin Loaf combines the warmth of pumpkin with the bright, zesty taste of whole orange, peel and all! A recipe straight from the professional kitchens of Le Cordon Bleu, this loaf is packed with seasonal spices, walnuts, and raisins, making it a delightful treat for breakfast, tea time, or dessert.  I was in the kitchen at Le Cordon Bleu to practice filleting a Dover Sole and turning mushrooms, and Chef shared a pumpkin loaf with me. It was so delicious, I asked for the recipe.

It uses a whole orange, making it extra flavorful and perfect for this Fall season. Enjoy!


Monday, November 10, 2008

Fill the Freezer—Cream of Tomato Soup

Cream of Tomato Soup – A Rich & Comforting Recipe Cream of Tomato Soup

There are so many tomato soup recipes out there, but this is my favorite because every time I've made it for people, they have always requested the recipe. It's a crowd-pleaser, can be made ahead and is festive for the holiday season.

It also contains a secret ingredient: allspice. Allspice is the dried fruit of the Pimenta dioica plant, but it has the flavors of some other spices: cinnamon, ginger, nutmeg and cloves.

You can make this soup now, put it in canning jars, and freeze it. Once it's frozen, remove it from the jar and freeze in a freezer bag. This way you can use the canning jar for other uses.

Serve with baked Parmesan Crisps, Cheddar Shortbread or Goldfish! You can serve the soup in antique tea cups at Christmas or shot glasses for a cocktail party.

Recipe: Cream of Tomato Soup

8-10 servings

from The New Basics CookbookIngredients for Cream of Tomato Soup by Julee Rosso and Sheila Lukins

Ingredients:

4 tablespoons unsalted butter
2 onions, sliced
1 carrot, chopped
6 cloves garlic, minced
2 cans (28 oz each) tomatoes
1 tablespoon pesto or 1 tablespoon fresh basil, chiffonade
pinch of sugar
salt and pepper
4 cups chicken or turkey stock
1/2 teaspoon ground allspice
2 cups whipping cream

You can find the recipe for Kugelhopf in the book The New Basics Cookbook (affiliate link).


Thursday, October 23, 2008

Pumpkin Crème Brûlée: Inside, Outside, Upside Down

Pumpkin Crème Brûlée: Inside, Outside, Upside Down Pumpkin Crème Brûlée: three waysPumpkin Crème Brûlée three ways. I've wanted to try this for awhile now, and with pumpkin season upon us, I thought this would be a good time to give it a go. Recently, I made traditional crème brûlée and a frozen version. This time I tried it "inside, outside, and upside down" inspired by Stan Berenstain and the Berenstain Bears. This was a popular book for me when I was a kid and now for my children too.

Since crème brûlée and crème caramel (which I've posted about twice—here and here—on this blog) are such close cousins, I tried using one recipe to make both.

When I explained this idea to a friend, she was confused by the variations. Here's my explanation:

• Inside = traditional crème brûlée, served in a ramekin with the crackly top.
• Outside = crème brûlée baked in a parchment-lined ramekin and inverted onto a wafer or cookie and served outside the ramekin
• Upside down = traditional crème caramel inverted onto a serving platter

Pumpkin Crème Brûlée: Inside, Outside, Upside DownI found it interesting when I had a poll on my blog that crème brûlée won 9 to 2 over crème caramel. My favorite is crème caramel. So with this recipe, you can please everyone.

Recipe: Pumpkin Crème Brûlée

Makes: 4 cups of custard

Ingredients for Pumpkin Crème Brûlée: Inside, Outside, Upside Down

Ingredients:

For the Custard:
1 cup heavy cream
½ cup whole milk
2 teaspoons pure vanilla extract
½ cup sugar
3 large eggs
2 egg yolks
1 cup canned unsweetened pumpkin purée
¼ teaspoon salt
1 teaspoon ground cinnamon
Pinch of nutmeg

For the Caramel:
1/3 cup sugar
4 tablespoons water
¼ teaspoon lemon juice

For the Crème brûlée top:
4 tablespoons sugar

Instructions:

To make the caramel: bring the sugar, water, and lemon juice to a boil. Cook, without stirring, until the syrup turns a light caramel color. Pour the caramel into ramekins, and tilt so that it covers the bottoms and sides. Let cool.

Note: If you want to serve the caramel separately as hard and brittle, pour it onto wax paper or a silicone-lined baking sheet and let it cool. It will harden. Break apart like you would for peanut brittle. Serve alongside the custard.

To get ready: Preheat the oven to 300˚F.

To make the custard: In a small saucepan, bring the heavy cream, milk, and vanilla to a boil. Meanwhile, in a heatproof bowl, whisk the eggs, egg yolks, and sugar until blended. Stir in the pumpkin purée, salt, cinnamon, and nutmeg. Whisking constantly, pour the hot milk into the egg mixture; let rest for a few minutes, then strain. Pour the custard into the caramel-lined ramekins.

Place the ramekins in a baking dish. Add boiling water to come about two-thirds up the sides of the ramekin. Transfer the pan to the oven. Bake until a knife inserted into the center of the custard comes out clean, about 25-30 minutes. Let cool. Chill for 2-3 hours.

Pumpkin Crème Brûlée: Inside, Outside, Upside DownTo serve as crème brûlée: sprinkle sugar evenly over top of cooked, cooled custards. Using a torch, move the flame continuously over the surface of the ramekins until the sugar melts and becomes golden brown and bubbly.

To serve as crème caramel: run the tip of a knife around the edge of the custard to loosen it. Invert a serving platter over the ramekin and quickly turn it over again. Carefully remove the ramekin.

Happy Fall!

Fall

More to Explore:


Tuesday, October 21, 2008

Tuesdays with Dorie—Pumpkin Muffins

Pumpkin Muffins - A Spiced Fall Treat Pumpkin MuffinsThese Pumpkin Muffins have lots of ingredients to please all sorts of taste buds: the crunch of the pecans and sunflower seeds, the soft chew of the raisins, and the spice from the cinnamon/ginger/nutmeg/allspice blend. Although the ingredient list is long, it only requires two bowls: one for the dry ingredients and the other for all the rest, and it goes together fast. These muffins are inspired by the famous pumpkin muffins at Sarabeth's Kitchen in New York.
Dorie on pumpkin: "If this vegetable were getting its kindergarten report, it would get an A for 'playing well with others.' I confess that my pumpkin doesn't come from the patch, but right off the supermarket shelves. I always used canned purée (not pie filling, which is already spiced) and always have a couple of cans in the cupboard because a craving can strike long after—or long before—the proverbial frost is on the pumpkin." 
Have you ever taken something you shouldn't? A cookie from the grocery store that are set out to keep the kids quiet long enough to do your grocery shopping in record speed? An extra sample from the Costco ladies saying it's for your child knowing full well they won't like it? A magazine from your Doctor's office? Confession time: For this Pumpkin Muffin recipe, I used the mini ketchup containers from McDonald's! I didn't take very many, but enough to make some one-bite muffins. You could play around and use cookie cutters to bake them in as I did for my Banana Chocolate Chip Muffins. Also, I had extra pumpkin pie filling from my Pumpkin Chai Tart so I used that instead of the unsweetened pumpkin purée suggested in the recipe. Doing this added a touch of chai and coconut to the mix, which was nice. 

Recipe: Pumpkin Muffins

Ingredients for Pumpkin MuffinsYou can find the recipe for Pumpkin Muffins in the book Baking: From My Home to Yours (affiliate link) by Dorie Greenspan or here. To see how the rest of the TWD group fared with this week's recipe, click here and then click on each blogger! Thanks to Kelly from Sounding My Barbaric Gulp who chose the recipe for this week. Tasting Notes I loved these pumpkin muffins. They were best fresh from the oven, but I've been enjoying several since then too. 

Recipe for Next Week (October 28) Chocolate-Chocolate Cupcakes on pages 215-217 chosen by Clara from I Heart Food4Thought. Gift Giveaway Winner Thanks to everyone for leaving a comment on last week's TWD post! I used Random.org and the first number in the sequence that it generated was 54. So, #54 was Annette from Bun in the Oven. Annette, thanks for dropping by! I'll be in touch about the 1-year subscription to Bon Appétit magazine. Congratulations!


Thursday, October 16, 2008

Sugar High Fridays (SHF) #48 Spice—Pumpkin Chai Tart

Pumpkin Chai Tart baked in the lid of a canning jarIt's pumpkin pie season here, and Thanksgiving weekend just ended in Canada. My 9-year old daughter loves pumpkin pie, so, together we spent an afternoon making pie crust and pumpkin pie filling. She's my buddy in the kitchen, always wanting to help stir or break an egg or taste the batter. And she has an amazing set of taste buds that can differentiate the subtleties of bitter or sour, dark chocolates, and Dutch-processed versus natural cocoa powder. She's my taste tester, and I look forward to many more hours spent in the kitchen with her as she grows up.

For this pumpkin pie, I wanted to add a couple of my favorite flavors: chai tea and coconut. Masala chai is a tea that's infused with spices like cinnamon, cardamom, star anise, cloves and ginger. At the grocery store, I found some Maple Sugar made in Quebec so I used it instead of regular sugar. For extra spice, I added some ground ginger to the crust. All these spices and flavors blended nicely with the pumpkin and made a special pie for Thanksgiving.

Pumpkins at the Byward MarketPlaying Around
I bought some wide-mouth canning jars a while ago thinking they were so pretty and hoped to do some canning this year. But, instead of canning, I used the lids as removable bottom tart pans. They worked great. Just make sure you put them on a parchment-lined baking sheet for baking.

Recipe: Pumpkin Chai Tart

Makes: 8 individual or 1 9-inch tart

Ingredients for Pumpkin Chai Tart
Note: The filling makes more than you need for the crust. Either double the crust or half the filling.

Ingredients:

For the Crust:
1 ¼ cups flour
½ teaspoon sugar
½ teaspoon salt
½ teaspoon ground ginger
3 tablespoons whole milk
1 egg yolk
7 ounces unsalted butter, softened and cut into pieces

For the Filling:
15 ounces pure pumpkin
1 ¼ cup heavy cream
1/8 cup coconut milk
1 cinnamon stick
5 whole cloves
1-inch piece fresh ginger, grated
1 chai teabag
¾ cup maple sugar (or 1 tablespoon maple syrup plus 11 tablespoons sugar)
¼ teaspoon salt
3 eggs

Instructions:

For the crust: Mound the flour, sugar, salt, and ginger on the counter. Make a well and pour the milk and egg yolk in. Start to mix this up with your fingers. Start adding the butter and work it together until it forms a ball. Gather it into a ball and wrap it in plastic wrap. Chill for 4 hours or up to 2 days before rolling and baking.

Note that this dough is tricky to roll out since there's so much butter in it, but it is so tender and crispy that it's worth the extra effort.

Roll out dough between two sheets of wax paper until 1/8-inch thick. Transfer dough to pie dish. Crimp dough edge decoratively. Chill for 30 minutes before baking.

Preheat oven to 425˚F. Line crust with foil. Fill with pie weights or dried beans. Bake until sides are set, about 20 minutes. Remove foil and weights. Bake until golden brown. Place aluminum foil collar around edge of crust if it browns too quickly, about 15 minutes. Cool completely.

For the filling: Preheat oven to 325˚F. Heat the heavy cream, coconut milk, cinnamon stick, cloves, ginger, and chai teabag until it comes to a boil. Remove from the heat, and stir in the sugar and salt. Let this mixture steep for 5 minutes. In a separate bowl, whisk the eggs. Strain the cream mixture into a bowl. Slowly whisk in the eggs, tempering them so that the eggs don't curdle. Pour mixture into cooled crust. Bake until filling is set and knife inserted into center comes out clean, about 1 hour for a 9-inch tart and 30 minutes for individual tarts. Cool to room temperature.

Pumpkin Chai Tart baked in the lid of a canning jarSugar High Fridays

Sugar High FridaysThis is my submission to Sugar High Fridays, a dessert-focused food-blogging event created by Jennifer from The Domestic Goddess. This month's event is hosted by Anita from Dessert First Girl and the theme is spice.


More to Explore:


Wednesday, September 17, 2008

Whisk Wednesdays—Éstouffade de Boeuf Provençale (Braised Beef Casserole, Provence Style)

Éstouffade de Boeuf Provençale (Braised Beef Casserole, Provence Style)Éstouffade (Es-too-fahd) de Boeuf Provençale or Pot Roast. Which sounds better? The French have a flair for making food sound fancy and delicious. And this dish doesn't just sound delicious, it is delicious.

Éstouffade is a beef stew simmered slowly in a covered casserole dish. The technique is braising, where your goal as "Chef" is to take a cheap, tough cut of meat and make it tender and tasty. Unlike stewing which uses small chunks of meat, braising usually uses a large cut of meat. Turning a hunk of meat into a tender morsel is a bit of magic and science.

A Demo
A few years ago, I attended a demo at Le Cordon Bleu in Basic Cuisine, and it was this class #16 " Les Braisages (Braising)". I casually walked into the classroom before it began, as I have often done for other classes. I and another visitor both found a spot to sit and watched the Chef prepare for the class. I was wondering why the students milling about in the hallway outside weren't coming in, but I realized that at precisely 8:15 a.m., they were allowed to enter and find their seats. Of course, they all addressed the Chef as "Chef" with a capital "C". "Yes, Chef" and "Excuse me, Chef" were heard throughout the morning. I thoroughly enjoyed being a fly on the wall during this demo class. I've enjoyed looking over my notes from that class {after finding them buried under a huge pile of recipes yet to try].

The recipes covered that day were

• Boeuf à la mode (Pot-roast)
• Carré de porc braisé nivernaise (Braised pork rack with carrots, onions, potatoes and lettuce)
• Navarin d'agneau printanier (Braised lamb shoulder stew)

As the Chef prepared the dishes, he talked easily about how lamb is fed, how long it takes to grow a chicken, the use of steroids and antibiotics in poultry, the benefits of organic meat, and occasionally quizzed the students about terminology.

As he was explaining how to butcher meat and the benefits of doing it by hand in your own kitchen, one student bravely asked why he couldn't go to the butcher and buy it already cut. The steely eyes and frustrated tone of the Chef answered him quickly, saying that a chef must be able to do all the food preparation.
"A good chef is worth ten doctors. In Napoleon's army, every captain was a chef."
– So Said the Chef at Le Cordon Bleu that day
Choose the Meat
The meat you select for braising should be one of the leaner, tougher cuts, such as shoulder, shank or chuck. {Save your tenderloin for the grill!} Also, the shank adds more gelatin to the mix so the sauce is thicker at the end of the cooking process.

Beef Cuts
Fatten the Cow
Pork fatback is NOT bacon. I learned this the hard way. I used bacon. It's what I had in the refrigerator. I didn't have pork fatback. I should have gone to a butcher, I know. The bacon added too much flavor to this dish. Go get yourself some fatback, ya hear?

According to Chef, bacon has lots of water in it, shrinks more, and leaves more fat in the pan. {And an over-powering bacon flavor!}

Ok, so if you can't get any fatback, the next best thing is salt pork. It's not bacon either. Even if you get this salt pork, you must blanch it for 10 minutes, rinse, dry {repeat?} to remove all the extra salt they use to cure it.

Before using fatback in the beef, the Chef at the demo class said to marinate the fatback in cognac for 10 minutes. {I wish I'd found my notes before making this!}

Then, you cut the fatback into strips so that you can insert this fat into the lean cut of meat you're about to braise. {Sounds like cheating to me. Or, a better cheat might be to buy a well-marbled piece of meat.} The fat helps to keep the meat from drying out.

Peter Hertzmann has a great article about Boeuf à la mode where he also demonstrates his larding technique and in the end discusses whether or not larding was worthwhile.

Marinate
After adding fat to the lean cut of meat, it gets marinated {for up to 24 hours, if you can, for best flavor}.

The marinade has the usual suspects: onions, carrots and a Bouquet Garni. Tomatoes, garlic, red wine, olive oil and cognac round it out. {You're supposed to turn the meat after 12 hours. Oops. Forgot to do that.}

Braise
Now, it's time to braise. This is a brown braise, where food is browned first (seared) and then dark ingredients, such as red wine, are added.

After straining the marinade in a bowl and setting it aside for later, pat the beef dry so that it can sear. When you sauté the beef, you can add a bit of butter with the oil for extra flavor. Searing caramelizes the outside of the beef and adds more flavor. After it's seared {not burnt!}, drain the fat and set the meat aside to rest. Fry up some bacon. {This time you can use bacon as we all know and love it.} Add the vegetables from the marinade and cook them off until golden. Sprinkle some flour on this mixture and cook for a bit to remove the flour taste. The flour will help thicken the sauce at the end. Then add the strained juice from the marinade — -it's purple! This helps deglaze the pan and pick up all those {burned} bits from the bottom of the pan, called fond.
"…[fond] represents a portion of the essential principles of the roast
fallen from it in the process of cooking."
— Escoffier
Add the meat back into the pan, the tomatoes, the Bouquet Garni, and a bit of salt. The liquid should cover 1/3 of the meat. Add more water if it doesn't meet this stringent braising requirement. Add the vegetables from the marinade back to the pot. Bring to a simmer and then put it in the oven, covered, to finish, slowly. Don't let it boil. The liquid and steam cook the meat slowly until it's very tender. If it's cooked too fast, it will be dry and tough.

I found this great article about braising.

Thicken {or Reduce} the Sauce
"Reduce over medium heat until the sauce thickens slightly."
— from the recipe for Éstouffade de Boeuf Provençale (Braised Beef Casserole, Provence Style)
After taking the meat out and putting it aside to rest a spell, reduce the sauce. As you reduce, you should skim away any fat that comes to the surface. Reducing sounds easy, but I always have trouble with this step — not the skimming but the thickening part. I have to resist the urge to quickly make a roux to thicken the juices. I thought I reduced it enough, but my sauce was runny. Back to the stove to reduce it further, I went {the next day}. After reading these tips, I was prepared to dig out my potato flour to thicken it slightly.

The recipe says to add olives to the sauce {but I didn't}.

Recipe: Éstouffade de Boeuf Provençale (Braised Beef Casserole, Provence Style)
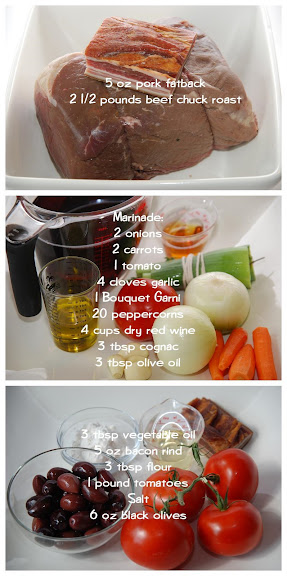
Éstouffade de Boeuf Provençale (Braised Beef Casserole, Provence Style) mise en placeYou can find the recipe for Éstouffade de Boeuf Provençale (Braised Beef Casserole, Provence Style) in the book Le Cordon Bleu at Home (affiliate link). To see how the rest of the Whisk Wednesdays group fared with this week's recipe, click here (or check out the sidebar) and then click on each blogger!

Purple Marinade
The marinade is PURPLE!

Tasting Notes
I made some {well, many} mistakes on this seemingly, easy pot roast. Too bacon-y. Too over-cooked. Sauce was runny. But, everyone enjoyed it, even so, and it was even better the next day. {No anchovies this week! Yay} Next time, I'll try Harold McGee's tip to use a cooler oven (200˚F for the first two hours and then 250˚F for the last hour). I'll also check my butcher for fatback. And, I'll spend more time reducing the sauce. And maybe I'll ask for a Moroccon Tagine for Christmas! That should definitely help!

Next Week (September 24)
• Blanquette de Veau à l’Ancienne (White Veal Stew with Onions and Mushrooms) page 55-56

. . . . . . . . . .

Running total: $752.74 + $21.00 (beef) + $6.46 (marinade) + $4.48 (finishing) = $784.68

Butter used so far: 7 pounds, 27 tablespoons

More to Explore: