Wednesday, July 16, 2008

Whisk Wednesdays—Julienne Darblay (Creamed Leek and Potato Soup with Julienned Vegetables)

Creamed Leek and Potato Soup with Julienned Vegetables – A Silky Smooth Delight

Creamed Leek and Potato Soup with Julienned VegetablesLeeks and potatoes are a classic pairing in Vichyssoise (pronounced vee shee swahzz), the cold version of this soup. Julienne Darblay is served hot with an “elegant” garnish of julienned vegetables.

History
Vichyssoise was invented by a French chef named Louis Diat in New York City near the beginning of the 20th Century. He worked at the Ritz-Carlton Hotel on Madison Avenue at 46th Street and called this soup Creme Vichyssoise Glacée, or Chilled Cream Vichyssoise, after the town where he was born.

Base of Chicken Stock
The base of this soup is chicken stock, so I was able to use up more stock from my freezer that I made earlier in the year. Julia Child’s version of Vichyssoise uses water, but the extra flavor from a homemade chicken stock improves the soup’s flavor.

Leeks and Potatoes
Leeks and PotatoesIt’s important to clean leeks thoroughly since sand and dirt like to settle in-between the leaves. Here’s a video videoof Jacques Pépin cleaning a leek.

Although the recipe calls for dicing the potatoes, in the end the soup is puréed so the accuracy of each cut doesn’t have to be as precise. The reason to keep them a uniform size is for even cooking.

Thickening Agent
This soup, known as a potage, or thick soup, is thickened by puréeing the vegetables using a food mill, processor, or blender. I used my blender, but I made sure to take the feeder cap on the lid out, cover the hole with a dry towel, and hold the lid down when I turned the blender on. Otherwise, my kitchen would have been covered in soup!

The cream added at the end also serves to thicken the soup and add some more flavor.

Garnish of Julienned Vegetables
In this Julienne Darblay soup, the julienne refers to the garnish of vegetables cut into julienne and blanched. I used carrot, leek, and parsnip instead of turnip. (I actually made a mistake when I pulled the parsnip instead of the turnip from my refrigerator!) I like peppery flavor of the parsnip and this mild soup needed the extra flavor boost from the parsnip so it was a good mistake.

I ended up julienning more vegetables than I needed for the soup so next time I would only do enough for each bowl as a garnish. Also, julienning baby carrots isn’t such a good idea since it’s hard to get them uniform without wasting most of the carrot. Next time julienned carrots are called for, I’ll have to get the good ol’ fashioned kind of carrots that look like they’re actually grown in the ground!

Recipe: Julienne Darblay (Creamed Leek and Potato Soup with Julienned Vegetables)

Ingredients for Julienne Darblay (Creamed Leek and Potato Soup with Julienned Vegetables)You can find the recipe for Julienne Darblay (Creamed Leek and Potato Soup with Julienned Vegetables) in the book Le Cordon Bleu at Home (affiliate link). To see how the rest of the Whisk Wednesdays group fared with this week's recipe, click here (or check out the sidebar) and then click on each blogger!

Julienne Darblay (Creamed Leek and Potato Soup with Julienned Vegetables)Tasting Notes
This was a silky-smooth light soup. The crunch from the tender julienned vegetables made it even more delicious. I had to add quite a bit of salt and pepper for extra flavor. Although the recipe calls for white pepper, I’ve never liked it. I find it has a sharp, harsh taste, so I always just use freshly ground black pepper even though classically white soups shouldn’t have the ugly black specks in them!

This soup tasted even better while we were camping! I served it along with brie baked on the grill with chopped apples, pecans, and craisins. Delicious!

Julienne Darblay (Creamed Leek and Potato Soup with Julienned Vegetables)Next Week (July 23)
• Velouté Agnès Sorel (Cream of Chicken Soup) pages 444-445
Note that I may be late with my post since I'm travelling next week.

Leek. . . . . . . . . .

Running total: $475.26 + $7.73 = $482.99

Butter used so far: 6 pounds, 12 tablespoons

More to Explore:


Tuesday, July 15, 2008

Tuesdays with Dorie—Chocolate Pudding

Homemade Chocolate Pudding – Rich, Silky, and Comforting Chocolate PuddingNothing beats homemade chocolate pudding. I remember stirring the pot of chocolate pudding (from a box) on the stove anticipating the dessert we would have after dinner. Occasionally, we would have from-scratch-pudding, and that was a treat!

In Dorie’s version, the food processor does a bulk of the work. The pot leads by heating the milk and sugar, similar to a sugar syrup.

While the pot heats the milk, the food processor follows by preparing some key ingredients. It whizzes the dry ingredients to remove any lumps in the cocoa and cornstarch. It blends the sugar, eggs, and a bit of milk. And then it mixes the dry ingredients with the sugar/egg mixture.

After the pot has heated the milk, the food processor takes the lead by blending the hot milk with the sugar/egg/dry ingredient mixture.

Then, it’s back to the pot to thicken. Finally, the food processor finishes the job by blending the chocolate chunks, butter, and vanilla. This dance between the pot and the food processor results in a silky, smooth pudding.

“the food processor is like an insurance policy that makes sure the texture is smooth” ~ Dorie Greenspan ~
I found some roasted cocoa beans awhile ago at a chocolate boutique in Ottawa called Truffle Treasures and have been waiting for the right dessert to use it with, and this was it. A sprinkle of this bitter chocolate on top was perfect!

Recipe: Chocolate Pudding

Ingredients for Chocolate PuddingYou can find the recipe for Chocolate Pudding in the book Baking: From My Home to Yours (affiliate link) by Dorie Greenspan. Dorie has also published the recipe on her blog. To see how the rest of the TWD group fared with this week's recipe, click here and then click on each blogger! Thanks to Melissa of It’s Melissa’s Kitchen who chose the recipe for this week.

Chocolate PuddingTasting Notes

Smooth
Chocolate
Cool
Homey
Comforting
Delicious


Recipe for Next Week (July 22)
Cherry Rhubarb Cobbler on page 415 chosen by Melissa of Amanda from Like Sprinkles on a Cupcake.

More to Explore:


Wednesday, July 9, 2008

Whisk Wednesdays—Billy Bi (Mussel Soup)

Billy Bi (Mussel Soup) – Elegant, Creamy, and Flavorful

Billy Bi (Mussel Soup)We’ve left the tricky emulsion sauces behind and moved onto the first in a series of soups. The first soup on the list is Billy Bi (pronounced BILL-ee BEE and sometimes spelled bilibi or billi-b), which is a cream of mussel soup said to be one of the most elegant and delicious soups ever created.

Traditionally, the mussels are strained out, leaving a creamy smooth and silky soup. Now it is more often served with the mussels. I even went and bought more mussels the next day to finish off the leftover soup! There’s nothing like Le-Cordon-Bleu-style leftovers!

History
This mussel soup was created by chef Louis Barthe at Maxim’s in Paris, named after a regular customer William “Billy” Brand (not William Bateman Leeds, a late 19th century tin tycoon, who is often said to be the namesake), and is a signature dish at this famous restaurant. In the 1930s, Maxim’s was one of the first restaurants in the world to win three Michelin stars (the highest number possible). It was highly controversial at the time to serve mussels in such a fine establishment since they’re normally considered trash seafood.

In an online search for the Maxim’s menu to see if this soup is still listed, I found that a 1979 version was sold on eBay in May 2008 for $20 (Cdn). 

Mussels
I was able to find fresh, live mussels at our local specialty grocery store. They had been flown in from Prince Edward Island, and the fish monger asked me if I was going to have them for dinner that night as he carefully selected the mussels and placed them on top of a bed of ice in a bag. Then, he punctured some holes in the bag for them to breathe and reminded me to open the outer bag when I got home so that they would remain alive until I was ready to steam them.

I’ve generally had good luck with mussels, but once got a bag of mussels that tasted very fishy. It was awhile before I would cook with mussels again. Thankfully, this bag turned out to be fresh-tasting and juicy.

Mussels are so easy to prepare. Although some instructions tell you to remove the bunch of brown fibers found between the two shells of the mussel (called the byssus threads) by cutting them with scissors or pulling them out with a quick tug, the ones I buy seem to have this done for them already. (This is an indication that they’re farm raised and not wild.) A quick rinse under water to remove any residual sand, and a check to make sure their shells are closed tightly, then they’re good to go. If the shells are already open, then they’re dead and these ones should be thrown out. (When the mussel is unable to hold the two halves of its shell tightly shut together, it’s dead.) Throw out any that have chipped or broken shells as well. Also, if after cooking, they don’t open up, don’t eat them. Mussels spoil quickly after dying and could cause food poisoning. 

Also, in my reading about mussels, I stumbled across this rather funny quote from Anthony Bourdain, world renowned chef and tell-it-like-it-is kind of guy:

"mussels in restaurants…are allowed to
wallow in their own foul-smelling piss."
~ Anthony Bourdain in Kitchen Confidential ~

And then there were the dishes
When I first looked at this recipe, it seemed easy. However, when I went to make it I was surprised how long it took to finish and how many dishes and pots I ended up using!

Pot #1: In the first pot, you start preparing the first flavor base by cooking the shallots. Then, after adding the wine and water and a bit of aromatics in the form of celery, and bringing this mixture to a boil, you steam the mussels.

Pot #2: Into a second pot, you strain the liquid to avoid any sandy elements to the soup. Then, you have to remove the shells from the mussels, keeping the meat in a separate bowl. Taking half the mussels, you squeeze as much juice out of them as you can and add this to the cooking liquid, saving the other half to serve in the soup. {I would save the squeezed and disintegrated mussels next time and just chop them fine and serve them with the soup too instead of having just 5 mussels in each soup bowl!}

Pot #3: In the third pot, you make a roux and add the cooking liquid, which characterizes it as a velouté. Simmer this mixture for 20 minutes. After that, you add the cream and bring it to the boil. Finally, you add the saved mussels and warm them in the soup before serving.

Although your sink is overflowing at this point, each step is not difficult and you are rewarded with an amazing soup.

Recipe: Billy Bi (Mussel Soup)

Serves: 6

Mise en place for Mussel SoupYou can find the recipe for Billy Bi (Mussel Soup) in the book Le Cordon Bleu at Home (affiliate link). To see how the rest of the Whisk Wednesdays group fared with this week's recipe, click here (or check out the sidebar) and then click on each blogger!

This soup can be served hot or cold.

If you don't like mussels, I would suggest anything fresh as a substitute, such as lobster, langoustines, oysters, or clams. Although the recipe doesn't list salt in the ingredients, it definitely needed it.

Billy Bi (Mussel Soup)Tasting Notes
This was an amazing soup that was creamy and delicious. I’ve always enjoyed mussels, and the simplicity of this soup was perfect, even though it wasn’t so simple to make. Each pot had its purpose in developing the flavor. The first with the wine and aromatics, the second with the mussels and their juices, and the third with the roux, cooking liquid, and the cream. Each added a complexity and layer to the soup to make it more delicious with each step. I found out in one of the blogs I read regularly, Chez Christine, that “restaurant cooks try their best to push a pan's limits: to get things darker, browner, more flavorful.” I think this soup does this with each dirty pot that piles up in the sink. It’s definitely worth the dishes.

Next Week (July 16)
• Julienne Darblay (Creamed Leek and Potato Soup with Julienned Vegetables) page 133-134 (I will be camping, but I hope to find time to make it and post about it before I go.)

. . . . . . . . . .

Running total: $465.58 + $9.68 = $475.26

Butter used so far: 6 pounds, 8 tablespoons

. . . . . . . . . .

More to Explore:


Tuesday, July 8, 2008

Tuesdays with Dorie—Double-Crusted Blueberry Pie

It’s such a busy time right now with school out, new routines, packing, camping, travelling, visiting, swimming lessons, and so on. Summer holidays often seem busier than other times of the year, so I always find it nice and relaxing to retreat to the kitchen and bake something sweet. This blueberry pie was just the thing to bring a taste of summer to the table.

The filling itself is easy enough. Blueberries, sugar, flour and lemon with a touch of salt. Lining the bottom of the crust with breadcrumbs is pure genius too since it absorbs some of the liquid that oozes out of the blueberries.

In the past six months, I’ve made so much pastry. I enjoy piling the ingredients on the counter and squeezing them through my fingers to form a crust. I like the feel of the pastry coming together into a ball. It’s even better when the crust comes out of the oven crispy and flaky, and that’s what happened this week with Dorie’s blueberry pie. I made one 6-inch pie and 4 individual pies. By rolling it out between two pieces of wax paper, it was easier to move and handle.

A sprinkle of Le Cordon Bleu brown cane sugar with vanilla on top, and it was ready for the oven.

Recipe: Double-Crusted Blueberry Pie

You can find the recipe for Double-Crusted Blueberry Pie in the book Baking: From My Home to Yours (affiliate link) by Dorie Greenspan. To see how the rest of the TWD group fared with this week's recipe, click here and then click on each blogger! 

Tasting Notes
This was the best blueberry pie I’ve ever tasted, and the crust was so tender and flaky. Everyone enjoyed it with a dollop of ginger whipping cream or à la mode (or both). One friend even liked it doused with chocolate sauce!

Recipe for Next Week (July 15)
Chocolate Pudding on page 383. I will be camping, but I hope to find time to make it and post about it before I go.

More to Explore:


Wednesday, July 2, 2008

Whisk Wednesdays—Sauce Mayonnaise (Basic emulsified sauce) and Salade Messidor (Summer Harvest Salad)

Mayonnaise
Mayonnaise is another emulsification sauce made with egg yolks, a bit of water, oil, and some flavorings. The egg yolks are the liaison (or emulsifier) that gets the oil and water to combine in mayonnaise. The mustard you use becomes the dominant flavor, so pick one you like.

2 rules
There are 2 main rules you need to know to make mayonnaise (or hollandaise or Béarnaise, for that matter):
• Have all ingredients at room temperature so that the emulsification can happen.
• Add the oil SLOWLY.

Fixing a Broken Mayonnaise
If the sauce breaks, try adding a bit of cold water. If that doesn’t work, try a new bowl with a bit of mustard or a fresh egg yolk in it. Then slowly add a bit of broken mayo into it and whisk. Continue adding the broken mayo slowly.

Watch a Pro
Alton Brown has a detailed post about mayonnaise. 

Links
Here is a great link to some history about mayonnaise, and here’s another one with more background about this sauce.

Recipe: Sauce Mayonnaise (Basic emulsified sauce) and Salade Messidor (Summer Harvest Salad)

Mayonnaise ingredientsHarvest Summer Salad ingredientsYou can find the recipe for Mayonnaise and Salade Messidor (Summer Harvest Salad)
in the book Le Cordon Bleu at Home (affiliate link). To see how the rest of the Whisk Wednesday group fared with this week's recipe, click here (or check out the sidebar) and then click on each blogger!

Mayonnaise keeps for about 3 days in the refrigerator.

Tasting Notes
We usually have Hellmann's® Mayo in the fridge and only use it on burgers and sandwiches, but now I know how to make homemade mayonnaise. It wasn't that hard; it just required a ton of whisking. As far as mayonnaise goes, I was happy with the taste. I'm not sure I'll make it again, however, but now I can check off that I've made it and can make it in the future, if need be.

Next Week (July 9)
• Billy Bi (Mussel Soup) page 311

. . . . . . . . . .

Running total: $455.89 + $1.20 (Mayonnaise) + $8.49 (Salad) = $465.58

Butter used so far: 6 pounds, 5 tablespoons

. . . . . . . . . .

More to Explore:


Tuesday, July 1, 2008

Tuesdays with Dorie—Apple Cheddar Scones

Apple Cheddar SconesNo matter how you pronounce them, ScAWn or ScOHne or Scoooon (after the Coronation Stone), these are delicious.

In Ottawa, we have a wonderful little take-out restaurant called The Scone Witch where they make “sconewitches” using scones shaped into squares. You can get sconewitches such as goat cheese and tomato, ham and Gruyère, and poached salmon and cucumber. They serve a variety of different sweet scones too, such as Ginger-Currant, Lemon-Poppyseed, Oatmeal, Orange-Cranberry, and Vanilla-Cream. Dorie's apple cheddar scones would be delicious as a sconewitch with ham.

Scone Witch sign
The Sconewitch
Originally uploaded to FlickR by Ian David Blüm
(with permission)

Biscuit or Scone
Biscuits and scones are both leavened with baking soda or baking powder. Scones are often sweeter and have cream or buttermilk, making it richer. Scones are usually triangular while biscuits are circular. There are more differences listed here.

Scones "are made in a manner similar to biscuits and, in fact, share biscuits' buttery-layered texture, but their name, their shape, and the fact that they're served with tea rather than gravy, lift them to the level of fancier fare."
-Dorie Greenspan in Baking with Julia
The secret to light scones is wet batter. The stickier, the better. Don’t handle them too much, and they will be light and tasty.

Recipe: Apple Cheddar Scones

Ingredients for Apple Cheddar SconesYou can find the recipe for Apple Cheddar Scones in the book Baking: From My Home to Yours (affiliate link) by Dorie Greenspan. To see how the rest of the TWD group fared with this week's recipe, click here and then click on each blogger! 

Tasting Notes
These scones were wonderful—light, fluffy buttery, and delicious. One of my daughters, who eats grilled cheese sandwiches every single day of the school year and sometimes asks for it on weekends (!), loved these scones.

Recipe for Next Week (July 8)
Double Crusted Blueberry Pie on pages 361-363 chosen by Amy of South in Your Mouth.

More to Explore:


Sunday, June 29, 2008

Daring Bakers—Danish Braid

Coffee and Danish
This month, the Daring Bakers were asked to make a Danish braid the original Danish way, making layers of flaky, buttery pastry. It’s a laminated dough, similar to puff pastry, but with sugar and fewer turns. Tough. Daring. I’ve only made laminated dough once before, so I called in an expert, a friend’s mom who has made puff pastry many times and hundreds of breads.

To me, a Danish from the local bakery or grocery store is usually a stale, pastry with some blah fruit on top and a sticky drizzle of icing. But, freshly-made-from-your-own-oven Danish pastry is a whole other delight and worth the hours of rolling and waiting.

Kneading Dough & Braided Danish PastryKaffee and Wienerbrød
A Danish in Denmark is not a Danish. This pastry is known as Wienerbrød in Danish, meaning Vienna bread. In Northern European countries and France, this pastry is referred to as “Viennese”. In Austria and Germany, this pastry is referred to as “Kopenhagener Gebäck”.

Thanks to a bakers' strike by the Danes in the late 19th century, bakers from Vienna were brought in as replacements, and with them came Wienerbrød.

You can use the Danish pastry to make bear's claws, crescents, envelopes, palm leaves, pinwheels, pretzel shapes (called kringles), and snails. Our task was to make a braid. We could use any filling choice we wanted as long as it was homemade.

Fillings
A filling for Danish pastry can be anything: from pastry cream with jam to cream cheese and fruit, to something savory.

I chose to make cinnamon pastry cream with a strawberry-raspberry-rhubarb-orange-lavender filling. I also filled one with homemade blueberry jam. And in another, we used ground almonds, raisins, and icing sugar.

50-year-old Recipe for Danish Pastry

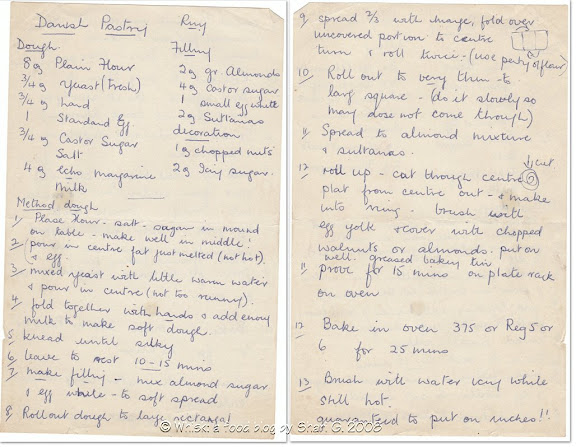
Danish Pastry Recipe - handwritten 50 years agoWhen I called my friend’s mom for her expertise and help with this recipe, she asked if we could also make a recipe for Danish Pastry that her friend from cooking school gave her 50 years ago that she's been meaning to make all these years. It didn’t require all the rigorous rolling, resting and chilling that the Daring Bakers’ version had, and it was interesting to compare the two danishes.
Danish Pastry with almonds
Click to see a larger picture


Danish Pastry (50-year-old handwritten recipe)

Dough
8 ounces plain flour
¾ ounce yeast (fresh)
¾ ounce lard
1 standard egg
¾ ounce castor sugar
salt
4 ounces Echo margarine
milk

Filling
2 ounces ground almonds
4 ounces castor sugar
1 small egg white
2 ounces sultanas
Decoration
1 ounce chopped nuts
2 ounces icing sugar

Method - Dough
1. Place flour, salt and sugar in mound on table. Make well in middle.
2. Pour in centre fat (just melted) not hot and egg
3. Mix yeast with little warm water and pour in centre (not too runny)
4. Fold together with hands and add enough milk to make soft dough
5. Knead until silky
6. Leave to rest 10-15 minutes
7. Make filling: mix almond, sugar and egg white to soft spread
8. Roll out dough to large rectangle
9. Spread 2/3 with margarine, fold over uncovered portion to centre;
turn and roll twice (use plenty of flour)
10. Roll out to very thin to large square (do it slowly so margarine does
not come through)
11. Spread with almond mixture and sultanas
12. Roll up and cut through centre. Plait from centre out and make
into ring. Brush with egg yolk and cover with chopped walnuts or
almonds. Put on well greased baking tin
13. Prove for 15 minutes on plate rack on oven
14. Bake in over 375 degrees for 25 minutes
15. Brush with water ice while still hot.

I loved the filling in this 50-year-old recipe. We added a hint of almond extract as well, and the flavor was delicious. The pastry was crisper and not as bread-like as the Daring Baker one. It was more similar to the ones I’ve bought at the store, but better because it was fresh from the oven. And, it was so much easier to whip up. In the time it took to rest the dough between folds, we had this recipe ready for the oven!

I like the quote in the hand-written recipe:
“Guaranteed to put on inches!”
Videos and Links
Here is a useful video about how to braid the dough. As usual, Joe Pastry provides lots of good information about laminated dough.

Recipe: Danish Dough

from The Secrets of Baking (affiliate link) by Sherry Yard

To see the different Danish Braids cropping up all over the foodblogosphere, check out the Daring Bakers Blogroll. 

Danish Braid IngredientsMake the détrempe: Mix yeast and milk on low speed. Add sugar, orange zest, cardamom, vanilla extract, vanilla seeds, eggs, and orange juice. Mix well. Change to the dough hook and add the flour and salt. Knead the dough for about 5 minutes, or until smooth. You may need to add a little more flour if it is sticky. Cover the dough with plastic wrap and refrigerate for 30 minutes.

Make the beurrage: Combine butter and flour and beat on medium speed for 1 minute. Set aside.

After the détrempe has chilled 30 minutes, turn it out onto a lightly floured surface. Roll the dough into approximately 18 x 13 inches and ¼ inch thick rectangle. Dust the dough with flour if it is sticky. Spread the butter evenly over the center and right third of the dough. Fold the left edge of the détrempe to the right, covering half of the butter. Fold the right third of the rectangle over the center third. The first turn has now been completed. Mark the dough by poking it with your finger to keep track of your turns. Place the dough on a baking sheet, wrap it in plastic wrap, and refrigerate for 30 minutes.

Place the dough lengthwise on a floured work surface. The open ends should be to your right and left. Roll the dough into another approximately 18 x 13 inches and ¼ inch thick rectangle. Again, fold the left third of the rectangle over the center third and the right third over the center third. No additional butter will be added as it is already in the dough. The second turn has now been completed. Mark the dough by poking it twice with your finger to keep track of your turns. Refrigerate the dough for 30 minutes.

Roll out, turn, and refrigerate the dough two more times, for a total of four single turns. Make sure you are keeping track of your turns. Refrigerate the dough after the final turn for at least 5 hours or overnight. The Danish dough is now ready to be used. If you will not be using the dough within 24 hours, freeze it. To do this, roll the dough out to about 1 inch in thickness, wrap it tightly in plastic wrap, and freeze. Defrost the dough slowly in the refrigerator for the easiest handling. You can keep Danish dough in the freezer for up to 1 month.

Filling: Cinnamon Pastry Cream and Strawberry Raspberry Rhubarb Orange Lavender Preserve

For the Cinnamon Pastry Cream

Pastry Cream IngredientsFrom Baking: From My Home to Yours (affiliate link) by Dorie Greenspan

2 cups whole milk
2 cinnamon sticks
6 large egg yolks
½ cup sugar
1/3 cup cornstarch, sifted
1½ teaspoons vanilla
3½ tablespoons unsalted butter, cut into 3 pats, at room temperature

Bring the milk and the cinnamon sticks to a boil in a small pot. Turn off the heat and allow the milk and vanilla to infuse for at least 10 minutes, or up to an hour.

In another saucepan, whisk the eggs, sugar, and cornstarch until smooth. Slowly drizzle in the milk, whisking constantly. If the milk is hot go slowly as it may curdle the eggs.

Once the milk and egg mixture are combined, remove the cinnamon sticks and set the pan over medium heat. Whisk until the mixture comes to a boil. Continue to whisk for a further minute or two. The mixture should be thick and creamy. Remove the pan from the heat.

Whisk in the vanilla and let sit for about 5 minutes.

Whisk in the butter slowly. Place plastic wrap directly on the surface of the cream and refrigerate until ready to use.

For the Strawberry Raspberry Rhubarb Orange Lavender Preserves

Strawberry Raspberry Rhubarb Orange Lavender Preserves2 cups strawberries, hulled
1 cup raspberries
2 stalk rhubarb, chopped
1 whole orange, whizzed in the food processor
Sprinkle of lavender
3 cups sugar

Cook this mixture for 1 hour. The natural pectin in the orange will give you the jell you need.

Finishing
Makes enough for 2 large braids

1 recipe Danish Dough
2 cups filling, jam, or preserves
1 large egg, for egg wash

Line a baking sheet with a silicone mat or parchment paper. On a lightly floured surface, roll the Danish Dough into a 15 x 20-inch rectangle, ¼ inch thick. If the dough seems elastic and shrinks back when rolled, let it rest for a few minutes, then roll again. Place the dough on the baking sheet.

Along one long side of the pastry make parallel, 5-inch-long cuts with a knife or rolling pastry wheel, each about 1 inch apart. Repeat on the opposite side, making sure to line up the cuts with those you’ve already made.

Spoon the filling you’ve chosen to fill your braid down the center of the rectangle. Starting with the top and bottom “flaps”, fold the top flap down over the filling to cover. Next, fold the bottom “flap” up to cover the filling. This helps keep the braid neat and helps to hold in the filling. Now begin folding the cut side strips of dough over the filling, alternating first left, then right, left, right, until finished. Trim any excess dough and tuck in the ends.

Whisk the whole egg lightly coat the braid with a pastry brush.

Spray cooking oil onto a piece of plastic wrap, and place over the braid. Proof at room temperature or, if possible, in a controlled 90˚F environment for about 2 hours, or until doubled in volume and light to the touch.

Near the end of proofing, preheat oven to 400˚F. Position a rack in the center of the oven.

Bake for 10 minutes, then rotate the pan so that the side of the braid previously in the back of the oven is now in the front. Lower the oven temperature to 350˚F, and bake for about 15-20 minutes more, or until golden brown. Cool and serve the braid either still warm from the oven or at room temperature. The cooled braid can be wrapped airtight and stored in the refrigerator for up to 2 days, or frozen for 1 month

Tips
I learned some things while doing this recipe:
• Use even pressure when rolling. It’s hard work and requires patience.
• Pull and stretch the dough to keep it a rectangle. Keep it neat and even.
• After you fold the dough, pull and stretch it to make it a neat rectangle.
• When you’re ready to put the filling on the dough, move it to a piece of parchment paper first. It’s very difficult to move once it’s been filled and braided!

Danish BraidTasting Notes
I loved the smell of the cardamom, vanilla and orange in the Danish dough. In the finished braid, you could see the layers of pastry and the bread-like texture was delicious!

I also liked how quickly the 50-year-old recipe came together. I will definitely be pulling that recipe out again. The filling is a keeper too and so simple.

A shout of thanks to Mrs. C. for helping me with this Daring Baker challenge! I learned a lot!!

More to Explore:


Wednesday, June 25, 2008

Whisk Wednesdays—Sauce Béarnaise (Warm emulsified sauce derived from Hollandaise sauce) with Steak

Béarnaise Sauce – A Classic French Culinary Delight
Béarnaise sauce

Now that we've completed the mother sauces, we're into the derivative ones and Béarnaise is one of the best. It's based on hollandaise but has an added flavor boost from a reduction of wine, shallots, wine vinegar, tarragon, and black peppercorns. Again, it’s an emulsification of eggs and butter, but with extra flavor from the herb and vinegar reduction. Traditionally, it’s served on beef, but it would be delicious on anything!

There are variations to the traditional recipe. Sometimes chervil, thyme, parsley, or bay is used as well as tarragon. Some use red wine vinegar or tarragon vinegar. Some recipes call for clarified butter and some for regular, room temperature butter. Some call for a blender while the more traditional recipes use just a whisk.

The last time I made Béarnaise was for the millennium celebrations in 1999. I remember using a blender and serving this sauce over tenderloin with shrimp and scallops on top as a garnish (à la The Keg). Pretty ritzy, eh? I haven’t made it since, but now it may be on our regular menu!

History
According to History of Sauces by Linda Stradley (What’s Cooking America), the sauce was created by Chef Jules Colette at his restaurant Le Pavillon Henri IV and served in the 1830s, but the sauce was named after Henri IV who was a gourmand born in Béarn, France and was King of France from 1589 to 1610.

"Don't be saucy with me Béarnaise..."
I had trouble when I made Béarnaise the first time. I added the clarified butter too fast, and it threw a tantrum and broke. I quickly consulted the cookbook, which told me to throw an ice cube into the mix to cool it off. This didn’t work. The next thing the cookbook suggested was to take a new pot, add a bit of cold water, and then add a ladle full of the sauce and whisk. Once that was smooth, add a bit more broken sauce to the fresh pot. Slowly, and ever patiently I whisked. And it worked! Thankfully, my eggs didn’t curdle so I was good to go. By this time, the T-bone steaks were ready, everyone was hungry, and I took a few casual photos and dug in. Later, looking at the photos, I realized I should have spent more time on the photo shoot!

A second Béarnaise sauce for lunch later in the week, no sauce tantrums (was I more patient or was it the room temperature butter?), more time with the photo shoot, and this time sauce spread leisurely over fried chicken, and again it was delicious!

I had some leftover Béarnaise sauce and attempted to re-heat it for supper. I put the burner on low, poured my leftover sauce into a clean pot, added 1 tablespoon of very hot water, and whisked like mad. Without stopping, I continued whisking, dipping my finger in for a heat-and-taste test, until the sauce was warm enough to drape over my leftover chicken. It worked, and it was delicious!

"A Béarnaise sauce is simply an egg yolk, a shallot,
a little tarragon vinegar, and butter,
but it takes years of practice for the result to be perfect."
–Fernand Point–
Who is Fernand Point?

"I believe Fernand Point is one of the last true gourmands
of the 20th century. His ruminations are extraordinary and thought-provoking. He has been an inspiration for legions of chefs.”

–Thomas Keller–
{On a side note, earlier this week I even made Eggs Benedict for one! It’s extremely dangerous to know how to whip this up on short notice given the amount of butter and the fact that it’s swimsuit season in these parts!}

Choking on Artichokes
On the artichoke front, I choked. This was the first time I’ve cooked artichokes! And I failed. First off, I had to get some tweezers to dig out the sliver of a prickle from one of the buggers. Then, I carefully de-leaved them until I thought I’d gotten to the light green center. After rubbing them lovingly with lemon, I plopped them into boiling water to cook. 30 minutes later, I took them out. I tried to dig out the middle to put the lovely un-broken Béarnaise sauce in, destroying 2 of the 3 chokes in the process. Then, when I finally sat down to eat, I daintily put one in my mouth and couldn’t chew it! Since artichokes are in the recipe for next week, I may try it again, but I need help.

Watch a Pro
Here’s a video showing how to make Béarnaise sauce. This video shows the solids from the reduction being strained and then thrown out, but the version in Le Cordon Bleu at Home keeps these in the sauce, which adds a nice texture to the sauce.

Links
12 Tips You Need To Make Perfect Bearnaise Sauce 
Béarnaise sauce
What is Béarnaise Sauce?

Recipe: Sauce Béarnaise (Warm emulsified sauce derived from Hollandaise sauce) with Steak

Béarnaise sauce mise en placeYou can find the recipe for Béarnaise sauce in the book Le Cordon Bleu at Home (affiliate link). You can also find a recipe for Salmon with Béarnaise sauce here. To see how the rest of the Whisk Wednesday group fared with this week's recipe, click here (or check out the sidebar) and then click on each blogger!

Béarnaise and steakTasting Notes
The hint of tarragon with its licorice taste, the sharpness of the shallots, and the creaminess of the eggs and butter make Béarnaise sauce the most amazing and delicious sauce yet! I was glad the sauce broke so that I could figure out how to fix it, and I was relieved that it worked. This is definitely a keeper and one I might even try serving for dinner guests, if I’m brave.

Next Week (July 2)
• Sauce Mayonnaise (Basic emulsified sauce) page 30-31
• Salade Messidor (Summer Harvest Salad)

. . . . . . . . . .

Running total: $446.39 + $5.15 (Béarnaise) + $4.35 (Artichokes) = $455.89

Butter used so far: 6 pounds, 5 tablespoons

. . . . . . . . . .

Next Week (July 2)
• Sauce Mayonnaise (Basic emulsified sauce) page 30-31
• Salade Messidor (Summer Harvest Salad)

Whisk Wednesdays:
If you would like to check out the other Whisk Wednesdays bloggers to see their take on Béarnaise sauce, click Kayte.


Tuesday, June 24, 2008

Tuesdays with Dorie—Mixed Berry Cobbler

Cobblers, Crumbles & More – A Delicious Fruit Dessert Guide Cobblers, crumbles, grunts, slumps, brown betties. All have fruit. All have a pastry, streusel, or cake-like portion. All are easy and all are delicious. Dorie's cobbler doesn’t disappoint either. You can find a pretty good description of each of these types of desserts here.

According to Dorie, “a cobbler is about the most flexible dessert you can think of. In fact, it may even have gotten its name because of its flexibility: you can cobble it together with just about anything you've got around.”

I cut some rhubarb from the garden and bought some local strawberries. The topping was simple and only required a squeeze and press to form on top of the individual cobblers I made.

Recipe: Mixed Berry Cobbler

Mixed Berry Cobbler ingredientsYou can find the recipe for Mixed Berry Cobbler in the book Baking: From My Home to Yours (affiliate link)s by Dorie Greenspan or at NPR where Dorie talks with Michele Norris about this great summertime dessert. Dorie also provides a blueberry-peach cobbler recipe at Serious Eats. To see how the rest of the TWD group fared with this week's recipe, click here and then click on each blogger! Thanks to Beth of Our Sweet Life who chose the recipe for this week.

Tasting Notes
This was such a simple and easy dessert. As the recipe says, go light on the strawberries since they reduce a lot during baking. I should have read the recipe more carefully, but it was still delicious!

Recipe for Next Week (July 1)
Apple Cheddar Scones on page 32.


Monday, June 23, 2008

Wordle Nonsense

Saw this on LifeHacker and had to give it a try! I copied the list of Recipes from my blog and pasted it into this cool applet called Wordle (before the Wordle game became a hit). According to Wordle, the size of a word in the visualization is proportional to the number of times the word appears in the input text, so I guess I've done a lot of Tuesdays with Dorie! 


Sugar High Friday (SHF) #44 Taste Canada: Sugar Pie in Jars

Sugar Pie in a Jar – A Canadian Sweet Treat Sugar Pie in a JarEarlier this year, I was hunting for a “Tarte au Sucre” recipe that is part of the cooking school curriculum I'm working through as a self-directed study. At first, I thought all I had to do was pull out the sugar pie recipe that’s common at Christmas time with French Canadians. I was disappointed to find out that the Tarte au Sucre I was being asked to make was a yeasted cake, like brioche with a sugar topping. Not even close to the French Canadian version!

When Jennifer of The Domestic Goddess, who launched the popular Sugar High Friday blogging event, announced that she was hosting this month and that the theme was Canadian sweets, I knew I had to participate. I also knew I had a chance to make Sugar Pie, the Canadian version (my take on it!). I took some liberties with the traditional recipe. Mine has Dulce de Leche, as if it weren't sweet enough already! I also had to throw in a touch of maple syrup, since it's made just 45 minutes from my home!

This pie is more often than not served as a tart, but I added a little whiff of pastry on top to keep its pie delineation. The addition of flour is debated, and I’m sure my flavoring additions will be hotly debated by traditionalists, but I have taste testers who will back me up saying it was delicious! However, they are not French Canadian and it was their first taste of sugar pie. Here’s a great article for some more information about sugar pie.

Earlier this month, I’d read about pie in jars. I’ve been waiting for the right opportunity to use this brilliant idea. Amy at Angry Chicken and LloydandLauren also made desserts in jars. I love it!

Recipe: Sugar Pie

Makes: 6 little jars or 1 8-inch pie

Sugar Pie ingredients
Pastry recipe is from Baking: From My Home to Yours (affiliate link) by Dorie Greenspan

Ingredients:

1½ cups flour
½ cup icing sugar
¼ teaspoon salt
1 stick plus 1 tablespoon butter
1 egg yolk
Drops of water

Filling:
1 cup brown sugar
3 tablespoons flour
2/3 cup (160 mL) evaporated skim milk
1/3 cup heavy cream
½ teaspoon vanilla
pinch of cinnamon
pinch of nutmeg
1 tablespoon Dulce de Leche
½ teaspoon maple syrup

Instructions:

For the pastry: Put all the ingredients on the counter. Blend with your fingers. Add drops of water until it comes together into a ball. Press a small ball into each jar. Chill in the refrigerator for half an hour. (Save some pastry dough for the top.)

Preheat the oven to 375˚F. Pre-bake the shells until they’re golden, about 8-10 minutes. Cool.

For the filling: In a small saucepan, combine the brown sugar, flour, evaporated skim milk, and heavy cream. Whisk constantly until thick. Boil for 2 minutes. Remove from heat and stir in vanilla, cinnamon, nutmeg. Dulce de Leche, and maple syrup. Let cool.

Preheat the oven to 375˚F. Pour the filling into the pre-baked shells. Top with a bit of pastry cut into a shape. Bake for 20-25 minutes.

Serve with ginger-flavored whipped cream or vanilla ice cream.

Sugar Pie in a JarTasting Notes
This is a rich, sweet dessert. Some like it with vanilla ice cream and some with whipped cream and some unadorned. It’s delicious in small doses, and especially fun to eat with a spoon from a jar!


Thursday, June 19, 2008

Brownie Pops

Brownie Pops – The Perfect Party Dessert Brownie PopsFor Mother’s Day a couple years ago, my daughter’s teacher collected favorite recipes from each student and compiled them into a booklet. It was and is a treasured gift for a foodie like me. One of the best recipes in this handmade book was one called “Best Brownies”.

I’ve made these brownies over and over, and they have the qualities I love in a brownie: cakey, chocolate-y, never-fail, and everyone likes them. Well, one daughter likes them with icing and the other without. They can’t even agree on brownies! :)

For a Barn Dance and BBQ that we went to on the weekend, I decided to make brownie pops and stick them into a half a watermelon for the dessert table. They garnered lots of oohs and aahs, and even the local flies liked them. Here I thought I was getting a nice picture of the brownie pops in the watermelon only to have a fly figure I needed some help with the food styling!

Recipe: Brownie Pops

Makes: 1 8x8 pan or 2 dozen pops or minisIngredients for Brownies

Ingredients:

½ cup (1 stick) butter, melted
1 cup sugar
1 teaspoon vanilla
2 eggs
½ cup flour
1/3 cup cocoa
¼ teaspoon baking powder
¼ teaspoon salt
Nuts (optional)

Instructions:

Heat oven to 350˚F. Grease a mini muffin pan with cooking spray.

In a medium bowl, stir together the butter, sugar, and vanilla. Add eggs, and beat well. Stir together flour, cocoa, baking powder and salt. Gradually add to egg mixture, beating until blended. Stir in nuts, if desired.

Fill a piping bag (or freezer bag), and fill the mini muffin cups. Bake for 12-15 minutes.

Recipe: Brownie Frosting

Ingredients:

3 tablespoons butter
3 tablespoons cocoa
1 tablespoon light corn syrup or honey
½ teaspoon vanilla
1 cup powdered sugar
1-2 tablespoons milk

Instructions:

Whisk all ingredients to spreading consistency.

Brownie Pops
Tasting Notes
This is my favorite brownie recipe! Enjoy!

For another brownie idea, check out my French Chocolate Brownies for Tuesdays with Dorie.

Also, I just got an email from a friend who made these for her 8-year-old son who was quoted as saying these brownies were "super duper extravaganza spectacular delicious."

Links to this Post
Lisa from The Cutting Edge Of Ordinary whipped up a batch of these brownies and blogged about it. Check it out!

More to Explore: