This month, the Daring Bakers were asked to make a Danish braid the original Danish way, making layers of flaky, buttery pastry. It’s a laminated dough, similar to puff pastry, but with sugar and fewer turns. Tough. Daring. I’ve only made laminated dough once
before, so I called in an expert, a friend’s mom who has made puff pastry many times and hundreds of breads.
To me, a Danish from the local bakery or grocery store is usually a stale, pastry with some blah fruit on top and a sticky drizzle of icing. But, freshly-made-from-your-own-oven Danish pastry is a whole other delight and worth the hours of rolling and waiting.
 Kaffee and Wienerbrød
A Danish in Denmark is not a Danish. This pastry is known as Wienerbrød in Danish, meaning Vienna bread. In Northern European countries and France, this pastry is referred to as “Viennese”. In Austria and Germany, this pastry is referred to as “Kopenhagener Gebäck”.
Thanks to a bakers' strike by the Danes in the late 19th century, bakers from Vienna were brought in as replacements, and with them came Wienerbrød.
You can use the Danish pastry to make bear's claws, crescents, envelopes, palm leaves, pinwheels, pretzel shapes (called kringles), and snails. Our task was to make a braid. We could use any filling choice we wanted as long as it was homemade.
Fillings
A filling for Danish pastry can be anything: from pastry cream with jam to cream cheese and fruit, to something savory.
I chose to make cinnamon pastry cream with a strawberry-raspberry-rhubarb-orange-lavender filling. I also filled one with homemade blueberry jam. And in another, we used ground almonds, raisins, and icing sugar.
50-year-old Recipe for Danish Pastry

When I called my friend’s mom for her expertise and help with this recipe, she asked if we could also make a recipe for Danish Pastry that her friend from cooking school gave her 50 years ago that she's been meaning to make all these years. It didn’t require all the rigorous rolling, resting and chilling that the Daring Bakers’ version had, and it was interesting to compare the two danishes.
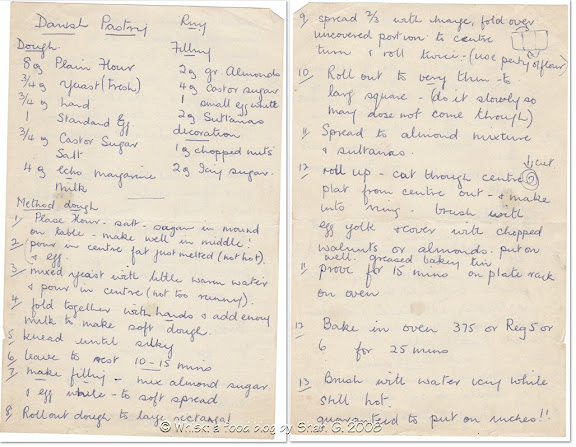 Click to see a larger picture
Danish Pastry (50-year-old handwritten recipe)
Dough
8 ounces plain flour
¾ ounce yeast (fresh)
¾ ounce lard
1 standard egg
¾ ounce castor sugar
salt
4 ounces Echo margarine
milk
Filling
2 ounces ground almonds
4 ounces castor sugar
1 small egg white
2 ounces sultanas
Decoration
1 ounce chopped nuts
2 ounces icing sugar
Method - Dough
1. Place flour, salt and sugar in mound on table. Make well in middle.
2. Pour in centre fat (just melted) not hot and egg
3. Mix yeast with little warm water and pour in centre (not too runny)
4. Fold together with hands and add enough milk to make soft dough
5. Knead until silky
6. Leave to rest 10-15 minutes
7. Make filling: mix almond, sugar and egg white to soft spread
8. Roll out dough to large rectangle
9. Spread 2/3 with margarine, fold over uncovered portion to centre;
turn and roll twice (use plenty of flour)
10. Roll out to very thin to large square (do it slowly so margarine does
not come through)
11. Spread with almond mixture and sultanas
12. Roll up and cut through centre. Plait from centre out and make
into ring. Brush with egg yolk and cover with chopped walnuts or
almonds. Put on well greased baking tin
13. Prove for 15 minutes on plate rack on oven
14. Bake in over 375 degrees for 25 minutes
15. Brush with water ice while still hot.
I loved the filling in this 50-year-old recipe. We added a hint of almond extract as well, and the flavor was delicious. The pastry was crisper and not as bread-like as the Daring Baker one. It was more similar to the ones I’ve bought at the store, but better because it was fresh from the oven. And, it was so much easier to whip up. In the time it took to rest the dough between folds, we had this recipe ready for the oven!
I like the quote in the hand-written recipe:
“Guaranteed to put on inches!”
Videos and Links
Here is a useful
video about how to braid the dough. As usual,
Joe Pastry provides lots of good information about laminated dough.
Recipe: Danish Dough
from
The Secrets of Baking (affiliate link) by Sherry Yard
To see the different Danish Braids cropping up all over the foodblogosphere, check out the
Daring Bakers Blogroll.
 Make the détrempe:
 Mix yeast and milk on low speed. Add sugar, orange zest, cardamom, vanilla extract, vanilla seeds, eggs, and orange juice. Mix well. Change to the dough hook and add the flour and salt. Knead the dough for about 5 minutes, or until smooth. You may need to add a little more flour if it is sticky. Cover the dough with plastic wrap and refrigerate for 30 minutes.
Make the beurrage: Combine butter and flour and beat on medium speed for 1 minute. Set aside.
After the détrempe has chilled 30 minutes, turn it out onto a lightly floured surface. Roll the dough into approximately 18 x 13 inches and ¼ inch thick rectangle. Dust the dough with flour if it is sticky. Spread the butter evenly over the center and right third of the dough. Fold the left edge of the détrempe to the right, covering half of the butter. Fold the right third of the rectangle over the center third. The first turn has now been completed. Mark the dough by poking it with your finger to keep track of your turns. Place the dough on a baking sheet, wrap it in plastic wrap, and refrigerate for 30 minutes.
Place the dough lengthwise on a floured work surface. The open ends should be to your right and left. Roll the dough into another approximately 18 x 13 inches and ¼ inch thick rectangle. Again, fold the left third of the rectangle over the center third and the right third over the center third. No additional butter will be added as it is already in the dough. The second turn has now been completed. Mark the dough by poking it twice with your finger to keep track of your turns. Refrigerate the dough for 30 minutes.
Roll out, turn, and refrigerate the dough two more times, for a total of four single turns. Make sure you are keeping track of your turns. Refrigerate the dough after the final turn for at least 5 hours or overnight. The Danish dough is now ready to be used. If you will not be using the dough within 24 hours, freeze it. To do this, roll the dough out to about 1 inch in thickness, wrap it tightly in plastic wrap, and freeze. Defrost the dough slowly in the refrigerator for the easiest handling. You can keep Danish dough in the freezer for up to 1 month.
Filling: Cinnamon Pastry Cream and Strawberry Raspberry Rhubarb Orange Lavender Preserve
For the Cinnamon Pastry Cream

From
Baking:
From My Home to Yours (affiliate link) by Dorie Greenspan
2 cups whole milk
2 cinnamon sticks
6 large egg yolks
½ cup sugar
1/3 cup cornstarch, sifted
1½ teaspoons vanilla
3½ tablespoons unsalted butter, cut into 3 pats, at room temperature
Bring the milk and the cinnamon sticks to a boil in a small pot. Turn off the heat and allow the milk and vanilla to infuse for at least 10 minutes, or up to an hour.
In another saucepan, whisk the eggs, sugar, and cornstarch until smooth. Slowly drizzle in the milk, whisking constantly. If the milk is hot go slowly as it may curdle the eggs.
Once the milk and egg mixture are combined, remove the cinnamon sticks and set the pan over medium heat. Whisk until the mixture comes to a boil. Continue to whisk for a further minute or two. The mixture should be thick and creamy. Remove the pan from the heat.
Whisk in the vanilla and let sit for about 5 minutes.
Whisk in the butter slowly. Place plastic wrap directly on the surface of the cream and refrigerate until ready to use.
For the Strawberry Raspberry Rhubarb Orange Lavender Preserves

2 cups strawberries, hulled
1 cup raspberries
2 stalk rhubarb, chopped
1 whole orange, whizzed in the food processor
Sprinkle of lavender
3 cups sugar
Cook this mixture for 1 hour. The natural pectin in the orange will give you the jell you need.
Finishing
Makes enough for 2 large braids
1 recipe Danish Dough
2 cups filling, jam, or preserves
1 large egg, for egg wash
Line a baking sheet with a silicone mat or parchment paper. On a lightly floured surface, roll the Danish Dough into a 15 x 20-inch rectangle, ¼ inch thick. If the dough seems elastic and shrinks back when rolled, let it rest for a few minutes, then roll again. Place the dough on the baking sheet.
Along one long side of the pastry make parallel, 5-inch-long cuts with a knife or rolling pastry wheel, each about 1 inch apart. Repeat on the opposite side, making sure to line up the cuts with those you’ve already made.
Spoon the filling you’ve chosen to fill your braid down the center of the rectangle. Starting with the top and bottom “flaps”, fold the top flap down over the filling to cover. Next, fold the bottom “flap” up to cover the filling. This helps keep the braid neat and helps to hold in the filling. Now begin folding the cut side strips of dough over the filling, alternating first left, then right, left, right, until finished. Trim any excess dough and tuck in the ends.
Whisk the whole egg lightly coat the braid with a pastry brush.
Spray cooking oil onto a piece of plastic wrap, and place over the braid. Proof at room temperature or, if possible, in a controlled 90˚F environment for about 2 hours, or until doubled in volume and light to the touch.
Near the end of proofing, preheat oven to 400˚F. Position a rack in the center of the oven.
Bake for 10 minutes, then rotate the pan so that the side of the braid previously in the back of the oven is now in the front. Lower the oven temperature to 350˚F, and bake for about 15-20 minutes more, or until golden brown. Cool and serve the braid either still warm from the oven or at room temperature. The cooled braid can be wrapped airtight and stored in the refrigerator for up to 2 days, or frozen for 1 month
Tips
I learned some things while doing this recipe:
• Use even pressure when rolling. It’s hard work and requires patience.
• Pull and stretch the dough to keep it a rectangle. Keep it neat and even.
• After you fold the dough, pull and stretch it to make it a neat rectangle.
• When you’re ready to put the filling on the dough, move it to a piece of parchment paper first. It’s very difficult to move once it’s been filled and braided!
 Tasting Notes
I loved the smell of the cardamom, vanilla and orange in the Danish dough. In the finished braid, you could see the layers of pastry and the bread-like texture was delicious!
I also liked how quickly the 50-year-old recipe came together. I will definitely be pulling that recipe out again. The filling is a keeper too and so simple.
A shout of thanks to Mrs. C. for helping me with this Daring Baker challenge! I learned a lot!!