
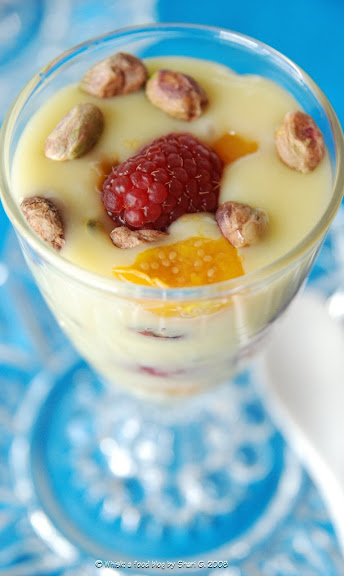
White Chocolate Toasted Pistachio with Ground Cherries and Passion Fruit Filling in Deep-Fried Pizza Dough
Try this unique dessert: deep-fried pizza dough filled with a creamy white chocolate, toasted pistachios, ground cherries, and passion fruit filling. A sweet twist on pizza!
 All month I've been wondering what to do with this month's Daring Baker challenge. Pizza just isn't the draw for me that it used to be before kids. Now, it's on the menu way too often at our house. So, what to do to make it interesting.
Here's what I came up with: deep-fried pizza dough sprinkled with confectioners' sugar and filled with white chocolate, toasted pistachios, ground cherries, and passion fruit. Since the pizza dough recipe makes a lot of dough, we also made cheese pizza that was so popular the kids fought over the last piece. And, I made a grown-up pizza topped with fajita chicken, salsa, and mushrooms. Everything was delicious!
To see the different versions of pizza cropping up all over the foodblogosphere, check out the Daring Bakers Blogroll. Thanks to Rosa from Rosa's Yummy Yums who hosted this month’s Daring Bakers event.
Also, we were asked to try tossing our own pizza dough. I tried, but caused a major hole in my dough. Here is a fun video showing a pro tossing pizza dough.
Recipe: Basic Pizza Dough
from The Bread Baker's Apprentice: Mastering the Art of Extraordinary Bread (affiliate link) by Peter ReinhartMakes: 6 pizza crusts (about 9-12 inches in diameter)

Ingredients:
4½ cups (20 1/4 ounces/607.5 grams) bread flour or all-purpose flour, chilled
1¾ teaspoon salt
1 teaspoon instant yeast
¼ cup (2 ounces/60 grams) olive oil or vegetable oil (both optional, but it’s better with)
1¾ cups (14 ounces/420 grams or 420 mL) water, ice cold (40°F/4.5°C)
1 tablespoon sugar
semolina/durum flour or cornmeal for dusting
1¾ teaspoon salt
1 teaspoon instant yeast
¼ cup (2 ounces/60 grams) olive oil or vegetable oil (both optional, but it’s better with)
1¾ cups (14 ounces/420 grams or 420 mL) water, ice cold (40°F/4.5°C)
1 tablespoon sugar
semolina/durum flour or cornmeal for dusting
Instructions:
DAY ONE
1. Mix together the flour, salt and instant yeast in a big bowl (or in the bowl of your stand mixer).
2. Add the oil, sugar and cold water and mix well (with the help of a large wooden spoon or with the paddle attachment, on low speed) in order to form a sticky ball of dough. On a clean surface, knead for about 5-7 minutes, until the dough is smooth and the ingredients are homogeneously distributed. If it is too wet, add a little flour (not too much, though) and if it is too dry add 1 or 2 teaspoons extra water.
Note: If you are using an electric mixer, switch to the dough hook and mix on medium speed for the same amount of time. The dough should clear the sides of the bowl but stick to the bottom of the bowl. If the dough is too wet, sprinkle in a little more flour, so that it clears the sides. If, on the contrary, it clears the bottom of the bowl, dribble in a teaspoon or two of cold water.
The finished dough should be springy, elastic, and sticky, not just tacky, and register 50°-55° F/10°-13° C.
3. Flour a work surface or counter. Line a jelly pan with baking paper/parchment. Lightly oil the paper.
4. With the help of a metal or plastic dough scraper, cut the dough into 6 equal pieces (or larger if you want to make larger pizzas).
Note: To avoid the dough from sticking to the scraper, dip the scraper into water between cuts.
5. Sprinkle some flour over the dough. Make sure your hands are dry and then flour them. Gently round each piece into a ball.
Note: If the dough sticks to your hands, then dip your hands into the flour again.
6. Transfer the dough balls to the lined jelly pan and mist them generously with spray oil. Slip the pan into plastic bag or enclose in plastic food wrap.
7. Put the pan into the refrigerator and let the dough rest overnight or for up to three days.
Note: You can store the dough balls in a zippered freezer bag if you want to save some of the dough for any future baking. In that case, pour some oil (a few tablespoons only) in a medium bowl and dip each dough ball into the oil, so that it is completely covered in oil. Then put each ball into a separate bag. Store the bags in the freezer for no longer than 3 months. The day before you plan to make pizza, remember to transfer the dough balls from the freezer to the refrigerator.
DAY TWO
8. On the day you plan to eat pizza, exactly 2 hours before you make it, remove the desired number of dough balls from the refrigerator. Dust the counter with flour and spray lightly with oil. Place the dough balls on a floured surface and sprinkle them with flour. Dust your hands with flour and delicately press the dough into disks about 1/2 inch/1.3 cm thick and 5 inches/12.7 cm in diameter. Sprinkle with flour and mist with oil. Loosely cover the dough rounds with plastic wrap and then allow it to rest for 2 hours.
9. At least 45 minutes before making the pizza, place a baking stone on the lower third of the oven. Preheat the oven as hot as possible (500° F/260° C).
Note: If you do not have a baking stone, then use the back of a jelly pan. Do not preheat the pan.
10. Generously sprinkle the back of a jelly pan with semolina/durum flour or cornmeal. Flour your hands (palms, backs and knuckles). Take 1 piece of dough by lifting it with a pastry scraper. Lay the dough across your fists in a very delicate way and carefully stretch it by bouncing it in a circular motion on your hands, and by giving it a little stretch with each bounce. Once the dough has expanded outward, move to a full toss.
Note: Make only one pizza at a time. During the tossing process, if the dough tends to stick to your hands, lay it down on the floured counter and re-flour your hands, then continue the tossing and shaping. In case you would be having trouble tossing the dough or if the dough never wants to expand and always springs back, let it rest for approximately 5-20 minutes in order for the gluten to relax fully, then try again. You can also resort to using a rolling pin, although it isn’t as effective as the toss method.
11. When the dough has the shape you want (about 9-12 inches/23-30 cm in diameter - for a 6 ounces/180g piece of dough), place it on the back of the jelly pan, making sure there is enough semolina/durum flour or cornmeal to allow it to slide and not stick to the pan.
12. Lightly top it with sweet or savory toppings of your choice.
Note: Remember that the best pizzas are topped not too generously. No more than 3 or 4 toppings (including sauce and cheese) are sufficient.
13. Slide the garnished pizza onto the stone in the oven or bake directly on the jelly pan. Close the door and bake for about 5-8 minutes.
Note: After 2 minutes baking, take a peek. For an even baking, rotate 180°.
If the top gets done before the bottom, you will need to move the stone or jelly pane to a lower shelf before the next round. On the contrary, if the bottom crisps before the cheese caramelizes, then you will need to raise the stone or jelly.
14. Take the pizza out of the oven and transfer it to a cutting board or your plate. In order to allow the cheese to set a little, wait 3-5 minutes before slicing or serving.

Chicken Fajita Pizza

1. Mix together the flour, salt and instant yeast in a big bowl (or in the bowl of your stand mixer).
2. Add the oil, sugar and cold water and mix well (with the help of a large wooden spoon or with the paddle attachment, on low speed) in order to form a sticky ball of dough. On a clean surface, knead for about 5-7 minutes, until the dough is smooth and the ingredients are homogeneously distributed. If it is too wet, add a little flour (not too much, though) and if it is too dry add 1 or 2 teaspoons extra water.
Note: If you are using an electric mixer, switch to the dough hook and mix on medium speed for the same amount of time. The dough should clear the sides of the bowl but stick to the bottom of the bowl. If the dough is too wet, sprinkle in a little more flour, so that it clears the sides. If, on the contrary, it clears the bottom of the bowl, dribble in a teaspoon or two of cold water.
The finished dough should be springy, elastic, and sticky, not just tacky, and register 50°-55° F/10°-13° C.
3. Flour a work surface or counter. Line a jelly pan with baking paper/parchment. Lightly oil the paper.
4. With the help of a metal or plastic dough scraper, cut the dough into 6 equal pieces (or larger if you want to make larger pizzas).
Note: To avoid the dough from sticking to the scraper, dip the scraper into water between cuts.
5. Sprinkle some flour over the dough. Make sure your hands are dry and then flour them. Gently round each piece into a ball.
Note: If the dough sticks to your hands, then dip your hands into the flour again.
6. Transfer the dough balls to the lined jelly pan and mist them generously with spray oil. Slip the pan into plastic bag or enclose in plastic food wrap.
7. Put the pan into the refrigerator and let the dough rest overnight or for up to three days.
Note: You can store the dough balls in a zippered freezer bag if you want to save some of the dough for any future baking. In that case, pour some oil (a few tablespoons only) in a medium bowl and dip each dough ball into the oil, so that it is completely covered in oil. Then put each ball into a separate bag. Store the bags in the freezer for no longer than 3 months. The day before you plan to make pizza, remember to transfer the dough balls from the freezer to the refrigerator.
DAY TWO
8. On the day you plan to eat pizza, exactly 2 hours before you make it, remove the desired number of dough balls from the refrigerator. Dust the counter with flour and spray lightly with oil. Place the dough balls on a floured surface and sprinkle them with flour. Dust your hands with flour and delicately press the dough into disks about 1/2 inch/1.3 cm thick and 5 inches/12.7 cm in diameter. Sprinkle with flour and mist with oil. Loosely cover the dough rounds with plastic wrap and then allow it to rest for 2 hours.
9. At least 45 minutes before making the pizza, place a baking stone on the lower third of the oven. Preheat the oven as hot as possible (500° F/260° C).
Note: If you do not have a baking stone, then use the back of a jelly pan. Do not preheat the pan.
10. Generously sprinkle the back of a jelly pan with semolina/durum flour or cornmeal. Flour your hands (palms, backs and knuckles). Take 1 piece of dough by lifting it with a pastry scraper. Lay the dough across your fists in a very delicate way and carefully stretch it by bouncing it in a circular motion on your hands, and by giving it a little stretch with each bounce. Once the dough has expanded outward, move to a full toss.
Note: Make only one pizza at a time. During the tossing process, if the dough tends to stick to your hands, lay it down on the floured counter and re-flour your hands, then continue the tossing and shaping. In case you would be having trouble tossing the dough or if the dough never wants to expand and always springs back, let it rest for approximately 5-20 minutes in order for the gluten to relax fully, then try again. You can also resort to using a rolling pin, although it isn’t as effective as the toss method.
11. When the dough has the shape you want (about 9-12 inches/23-30 cm in diameter - for a 6 ounces/180g piece of dough), place it on the back of the jelly pan, making sure there is enough semolina/durum flour or cornmeal to allow it to slide and not stick to the pan.
12. Lightly top it with sweet or savory toppings of your choice.
Note: Remember that the best pizzas are topped not too generously. No more than 3 or 4 toppings (including sauce and cheese) are sufficient.
13. Slide the garnished pizza onto the stone in the oven or bake directly on the jelly pan. Close the door and bake for about 5-8 minutes.
Note: After 2 minutes baking, take a peek. For an even baking, rotate 180°.
If the top gets done before the bottom, you will need to move the stone or jelly pane to a lower shelf before the next round. On the contrary, if the bottom crisps before the cheese caramelizes, then you will need to raise the stone or jelly.
14. Take the pizza out of the oven and transfer it to a cutting board or your plate. In order to allow the cheese to set a little, wait 3-5 minutes before slicing or serving.

Recipe: Deep Fried Pizza Dough

Ingredients:
Oil
Confectioners' sugar
Prepare the pizza dough up to step 11 above.
In a large, heavy-bottomed saucepan or fryer, heat the oil to 350˚F. Don't fill the pan more than one-third full. Carefully lower one piece of dough into the fryer. Cook on both sides until golden brown. Remove and press gently into a bowl to shape. Drain on paper towels. Sprinkle with confectioners' sugar.
Note: You can find out more about deep frying at my post on Deep-Fried Whiting.
 2½ ounce shelled, unsalted pistachios, toasted
3 ounces ground cherries (or you could use fresh cranberries)
1 ounce passion fruit
1/3 cup heavy cream
8 ounces white chocolate, chopped
2 tablespoon unsalted butter
Preheat the oven to 350˚F. Place the nuts on a baking sheet and toast for about 10 minutes or until golden.
Prepare a bowl with ice water. In a pot of boiling water, blanch the ground cherries for a couple of minutes until they soften slightly but do not burst. Plunge them into the ice water and let cool. Dry on a paper-towel-lined baking sheet.
Bring the cream to a boil. Pour over the white chocolate. Stir until smooth. (If the chocolate isn't completely melted, use the microwave to finish melting, but do it slowly so that the mixture doesn't separate.) Add passion fruit and butter, then stir to combine.
Scatter nuts and ground cherries in the deep-fried pizza dough, and then top with white chocolate mixture. Repeat until the deep-fried pizza dough is filled. Chill for 3 hours. Serve the same day since the fried pizza dough will not taste fresh the next day.
Note: Instead of deep-fried pizza dough, this filling is nice in a pastry tart shell or even on its own as a parfait.
 Here are my other Daring Bakers challenges:
 • Lavash Crackers and Honeydew-Peach Salsa (September 2008)
• Chocolate Éclairs…Kransekage (August 2008)
• Danish Braid (June 2008)
• Opéra Cake (May 2008)
Confectioners' sugar
Instructions:
In a large, heavy-bottomed saucepan or fryer, heat the oil to 350˚F. Don't fill the pan more than one-third full. Carefully lower one piece of dough into the fryer. Cook on both sides until golden brown. Remove and press gently into a bowl to shape. Drain on paper towels. Sprinkle with confectioners' sugar.
Note: You can find out more about deep frying at my post on Deep-Fried Whiting.
Recipe: White Chocolate Toasted Pistachio with Ground Cherries and Passion Fruit Filling
Makes: 4 tarts
Ingredients:
3 ounces ground cherries (or you could use fresh cranberries)
1 ounce passion fruit
1/3 cup heavy cream
8 ounces white chocolate, chopped
2 tablespoon unsalted butter
Instructions:
Prepare a bowl with ice water. In a pot of boiling water, blanch the ground cherries for a couple of minutes until they soften slightly but do not burst. Plunge them into the ice water and let cool. Dry on a paper-towel-lined baking sheet.
Bring the cream to a boil. Pour over the white chocolate. Stir until smooth. (If the chocolate isn't completely melted, use the microwave to finish melting, but do it slowly so that the mixture doesn't separate.) Add passion fruit and butter, then stir to combine.
Scatter nuts and ground cherries in the deep-fried pizza dough, and then top with white chocolate mixture. Repeat until the deep-fried pizza dough is filled. Chill for 3 hours. Serve the same day since the fried pizza dough will not taste fresh the next day.
Note: Instead of deep-fried pizza dough, this filling is nice in a pastry tart shell or even on its own as a parfait.
 Here are my other Daring Bakers challenges:
 • Lavash Crackers and Honeydew-Peach Salsa (September 2008)
• Chocolate Éclairs…Kransekage (August 2008)
• Danish Braid (June 2008)
• Opéra Cake (May 2008)
More to Explore:


42 comments:
Oh wow, it all looks so delicious! Your only a couple hours north of me I believe, are you getting hit with snow too?
honeyb - We sure are getting hit hard today with snow and wind!
Ciao ! I love the deep fried cups ! we are being hit hard with rain and ice ( i forgot the name !!!!) too !
Absolutely one of the best posts I have read so far. Your ideas are great. Now this is a way to approach a challenge. Brilliant! Deep frying? Sweet? Savory? You covered it all. I am impressed, indeed!
Wow! Fried pizza and with wonderful fillings! Great job with changing this up!
Great job on the different ways to prepare the pizza dough. The fried ones look like sopaipillas or bunuelos, the Mexican fried pastries.
I knew it! What incredible ideas here Shari! White Chocolate Toasted Pistachio with Ground Cherries and Passion Fruit Filling that's taking things to the top . . . but oh then you take another to the deep fryer!
You had a fun time!
Your variations sound and look delicious! The tossing didn't go over so well with me either. My dough was already too stretchy. I love what you did with this challenge. Your creativity is unmatched!
Your pizzas--regular and deep-fried--look delicious. We just made savory pizzas around here, but I should really try a dessert pizza one of these days.
Decadent! I think I gained weight thinking about your pizza creation. : )
deep fried??? awesome shari!!
What a lovely blog you have and you are a great photographer too. Your pizzas look SO good!!!
I love you little fried, sweet pizza cups! I have never had a sweet pizza before.
My WW is tucked in right behind my DB.
We had some snow last night and a lot of wind. Poles knocked down, etc. It is supposed to warm up for Halloween though.
Oh man my husband would have loved the fried pizza dough. Right up his alley! Great idea. You pics are great.
That's some pretty awesome deep fried dough. I really like the filling idea too - so yummy looking!
Fried pizza dough! How clever. Love what you did with it !
They all look amazingly delicious. Since I can't choose which is my favorite, I'll take one of each...
Healthy AND fun - how's that for a winning combination?
What fun takes on pizza! I love the sweet pizza. Great job Shari!
Deep fried pizza dough? oh yeah!!! Great job! It all looks delicious!
White chocolate on pizza....holy COW, that's a dream.
Nice nice nice job.
totally decadent!!!!
white chocolate on pizza... mmm. i gave you a blog award over at my site. :)
Oh my! I bow at your creative feet!! What a fun idea... deep frying your pizza dough.
OK, and those guys tossing pizza dough... that is insane! How in the world do they do that? I'll bet 10 bucks they couldn't have tossed my dough, lol.
Mmmmmm...fried dough! Sounds so good!
Deep fried pizza dough, now that is an absolutely fabulous idea! I love it. You were thinking outside the pizza box! ;)
First - you are all getting snow? I am soooo jealous!! It's 87 degrees here and I can't wait for a change of seasons!
Fried pizza crust sounds so unique, and I know my kids would love it! You always have such great ideas!
Bloody excellent deep fried pizza dough - sounds like you are touch with Elivs. Great videos. Congrats on getting on foodspotting.
Oh Shari!!! The Fried Pizza Dough sounds just wonderful and it's so pretty!!! I can't wait to try it out.
Michelle
Wow - all of the pizzas look fabulous! Great work!
Love your sweet take on it! Love the way you fried the dough first, this makes all the differences between an ok sweet pizza and an absolutely delicious one...in my opinion at least :)
deep fried! filled with pudding? you you are naughty! I can just imagine how flaky and absolutely heavenly this was. lovely idea!
Cool idea for the dessert pizza!
Nice Pizza! I really like your idea for the dessert it looks yummy! Nice videos as well. I put a video on mine as well but it's not pros tossing pizza dough so it's pretty hilarious!
I love your idea of the fried cups! They look delicious!
Whoa that is so totally awesome. Really.
Those fried pizzas are unlike anything I've seen before- And I really like it!
natalia - Deep fried dough is so decadent!
lynn - You're sooo sweet!
gretchen noelle - Thanks!
lynnylu - I've never tried the Mexican versions, but love deep-fried dough!
mykitcheninhalfcups - I worried about this pizza challenge all month, not knowing what I would do, but I ended up having fun!
mary ann - Thanks!
di - You can't go wrong with a dessert pizza
dana mccauley - I did gain weight eating these pizzas!
strawberriesinparis - Deep-fried isn't fattening, is it??
julie - Thanks!
matashya - You haven't had a bite of a sweet pizza at Pizza Hut even? They're not too bad, but homemade is so much better!
lori - Thanks!
engineer baker - It's a great and versatile filling. And easy. No bake.
y - Thanks!
matt - Come on over!
hypnosis - Healthy?! I wish.
anne - Thanks!
heather b - Beaver Tails are very popular here in Canada (Ottawa especially). If you're ever here, you'll have to try them. Deep-fried dough with toppings like cinnamon sugar.
lesley - Thanks!
tammy - Very decadent, but tasty in small portions.
karen - Thanks for the award!! You're a sweetie.
jacque - They couldn't have tossed my dough either!!
nicole - It was!
zoe francois - Thanks!
megan - We got too much snow, and it hasn't melted yet!
audax artifex - Thanks!
michelle - Let me know how it turns out for you!
tanya - Thanks!
linda - Frying adds that extra crunch.
meetak - It was a decadent (and naughty) dessert!
veggie wedgie - Thanks!
katie barlow - I'm impressed that you have a video of your tossing!
tarah at genesis of a cook - They were delicious!
rainbowbrown - Thanks!
hannah - Thanks for dropping by!
~Shari
There is only one word for you pizza. SHAZAM!!! Deep Fried, and white chocolate and tiny. Count me in. What a great Idea.
I love the little pizza cups ... nicely done!
You are such a genious! Loved your creations, your pizza cups are just amazing!
I wondered how this dough would work as a beaver tail and it seems it does. Now that I wouldn't mind trying the dough out for again.
Post a Comment