Taste, turning, trussing, and tears.
Last week, we had a seminar on taste! Spending a morning talking about taste was pretty cool! In many little white tubs, lined up in rows, were a variety of different colored liquids. In groups, we were given a container and asked to think of a memory that went along with it. Unfortunately, many of the tubs contained slightly stale versions of the originals, and too often Grandma's lace or even, in some cases, urinal pucks came to mind! Here's what we had to guess: white balsamic vinegar, lavender, truffle, shrimp paste, bergamot, lime, hazelnuts, sesame oil, anise-flavored alcohol, hoisin sauce, cognac, soy sauce, fish sauce, vanilla, port, rum calvados, pear alcohol, tabasco, chili paste. I found it challenging to deconstruct the aromas, but it was fun.
The next demo was all about Les Fonds Blanc et Brun (Brown and White Stocks), the base of sauces in French cuisine. We covered chicken stock, veal stock, tomato sauce (one of the mother sauces), and fish fumet. Our practical was to fillet a whole Dover sole, use the bones to make a fish fumet, and finish with a dish called Filet de sole de Douvres Dieppoise. This dish must include mussels and shrimp to be called Dieppoise. Not a problem. I've cooked mussels before and the shrimp came pre-cooked. However, the whole Dover sole slowed me down. It was the maiden voyage for my filleting knife and my hands with a whole fish. My filleting needed practice, so I attended an extra practice the next day and bought some frozen ones from the local fishmonger. I can happily say that I now know how to fillet a flatfish. I can't say that about turning mushrooms. Even after turning pounds of mushrooms that night, my mushrooms are more "carved" than "turned".
Here are some of the dishes the chef made during the demo.
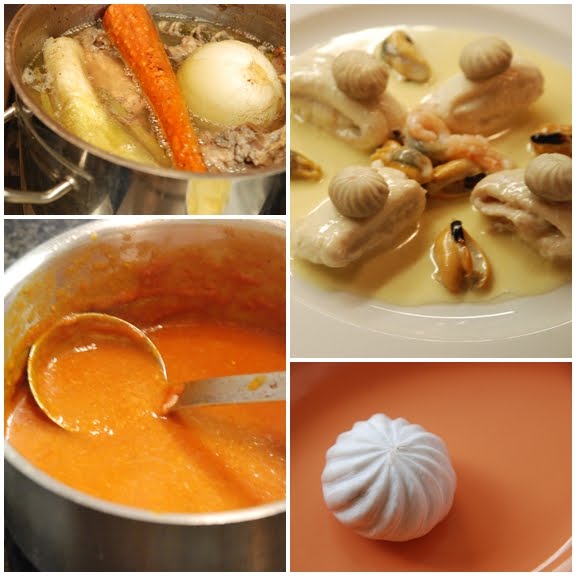 Clockwise from top: Chef’s Fond blanc de volaille (Basic recipe for white stock)
Filets de sole Dieppoise (Sole fillet served with a white wine sauce)
Turned mushroom
Sauce tomate (Tomato sauce)
The next demo discussed two more mother sauces (Espagnole and Béchamel) and their derivatives (demi-glace, Sauce Crème, Sauce Mornay, and Sauce Soubise). Trouble came when it was time to truss the chicken during the practical. It looks easy enough. Cut wing tips. Dig out the wishbone. String needle. Poke through cartilage in one leg, through the other leg, flip, through two bones of one wing, under neck, through two bones of the other wing, and tie. With the leftover string, thread through cartilage in one leg, through the pope's nose, and through cartilage in the other leg and tie the legs together. Tuck wings under. Not so hard. But it was for me. After three tries and each time, the chef shook his head saying "Do it again" in his stern, French accent, tears started to fall. I knew this would happen, but I thought it would be over a burnt sauce or charred meat, not over a simple truss. Meanwhile, the other students were getting their chicken broth cooking, but I was still bent over my string with salty tears brining my naked bird. Finally, I plopped my tear-stained and weakly tied bird into the pot and hid it with water hoping I could catch up. Unfortunately, I also seemed to pick the station where the flame kept going out under my pot. This bird did not want to get cooked.
I made my roux and checked it with the chef who with a slight air said I'd added a touch too much butter for the amount of flour. Then, it was onto the rice pilaf. The onions had to be cut in
ciseler fashion and were to be the size of a grain of rice. Some were; some weren't. I sweat the onions in butter making sure they didn't acquire any color, then added the rice and cooked until
nacré (a pearl color!). A bit of salt, a bouquet garni, the right amount of water, and a lid of parchment paper, and into the oven for exactly 17 minutes.
Back to the chicken. Checking it confirmed my fears: it wasn't cooked yet. And for some reason, I didn't think to remove some of the broth to reduce separately for the sauce. I turned my attention to the roux and mistakenly added the cream before adding the broth, ruining both in the process! This was not my day. So, I was back to making a new batch of roux. I quickly measured 30 grams of flour and butter and hastily set about to cooking it to the required blond, nutty color. By this time, I had the forethought to put some broth in a separate pot to reduce. When the roux was ready, so was my broth. I added it to my roux, thickened the mixture, and let it cook for as long as possible before adding the cream. Everything else came together. My sauce was
à la nappe, coating the chicken, my bird was cooked just right (not a second more), and my rice was done with the odd large piece of onion thrown in. And the tears buried in my chicken earlier made it taste even better.
Here are two of the dishes the chef made during the demo.
 Chef’s Sauce Espagnole and
Poulet poché sauce Suprême (Whole poached chicken served with a white creamy sauce)
The final demo last week was about emulsion sauces including hollandaise and Béarnaise. I love these two rich sauces. The first step in the Béarnaise is a reduction. Easy enough, but you need enough liquid after the reduction to make the sabayon. For the sabayon, which contains two yolks, you need two half-egg shells full of liquid. I thought I had enough, but it became apparent while whisking my sabayon that I was lacking a few drops! The chef came over, frowned, went to the sink dribbled a few more drops of water expertly in my bowl, and warned that it might break on me in no time flat. I whisked and whisked and whisked. Although it never broke, it was a little thick. Again, when the chef came over, and saw me whisking in the clarified butter on the "cold" side of the station, he grimaced and suggested I move to the stove side, again warning that my sauce would break and that it was saturated with butter! Funny because I had started clarifying more butter since I didn't have as much as the recipe called for. We also had to turn some potatoes
à l'Anglaise (a specific size that is three fingers long) and grill some salmon. Again, I finished on time, but a critique of my plate was all critique. School is tough, but I'm learning a ton, even through my tears.
Here are some of the dishes the chef made during the demo.
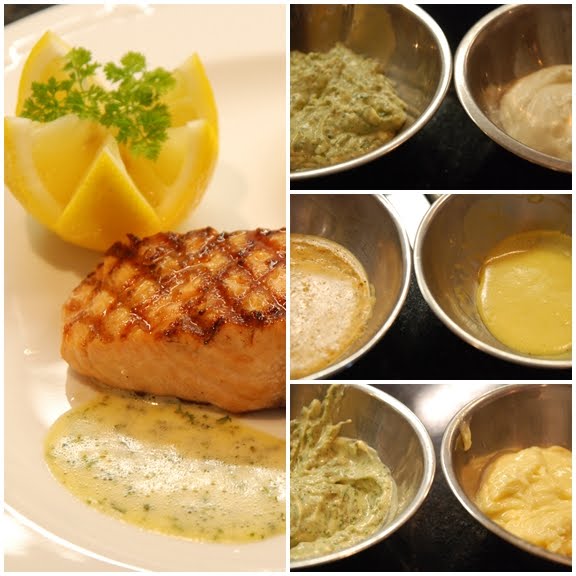 Clockwise from top: Chef’s Saumon Grillé, sauce Béarnaise (Grilled Salmon with Béarnaise Sauce)
Sauce Rémoulade (Sauce derived from Mayonnaise) & Hollandaise
Sauce Tyrolienne (Béarnaise sauce made with oil) & Sauce Moutarde (Sauce derived from Hollandaise)
Sauce Grebiche (Emulsified cold sauce based on cooked egg yolk) & Mayonnaise
. . . . . . . . . .
Here is a link back to the recipes as I did them last year (although they aren't exactly the same as what we did in class):
Class 10: Les Fonds Blanc et Brun (Brown and White Stocks)
Fumet de poisson (Fish stock)
Filets de sole Dieppoise (Sole fillet served with a white wine sauce)
Fond blanc de volaille (Basic recipe for white stock)
Fond brun clair de veau (Basic recipe for brown stock)
Sauce tomate (Tomato sauce)
Class 11: Les Sauces et Liaisons (Mother Sauces and Liaisons)
Poulet poché sauce Suprême (Whole poached chicken served with a white creamy sauce)
Sauce Espagnole and Demi-glace (Basic brown sauces)
Sauce Béchamel (White sauce): Crème, Mornay, and Soubise
Class 12: Les emulsions (Emulsion sauces)
Sauce Hollandaise (Warm emulsified sauce) and Sauce Moutarde
Sauce Béarnaise (Warm emulsified sauce derived from Hollandaise sauce)
Sauce Mayonnaise (Basic emulsified sauce) and Salade Messidor (Summer Harvest Salad)


.jpg) This recipe completes my goal of working through the Basic Cuisine curriculum on my own, in my own kitchen. I started my blog as a way of documenting my progress working through this Le Cordon Bleu curriculum, not knowing that I'd actually be attending 20 months later!
This recipe completes my goal of working through the Basic Cuisine curriculum on my own, in my own kitchen. I started my blog as a way of documenting my progress working through this Le Cordon Bleu curriculum, not knowing that I'd actually be attending 20 months later!


