
Monday, October 18, 2010

Apple Choosing and Apple Tart


we couldn't pick apples this year
mother nature had other plans for us

the frost bit the blossoms in the Spring
the apples fell early
the tree was bare

we had to choose
from a bin
or
from the ground

we went apple choosing
and still had fun


Apple pie has a rich history dating back to the late 14th century, with early recipes recorded in cookbooks of King Richard II’s time. One of the first written recipes for apple pie used a "coffin" pastry as a simple container, and sweeteners like sugar were often absent due to their rarity and high cost. Today, we enjoy apple pie in various forms, with tender, flaky crusts, and sweet apple fillings.

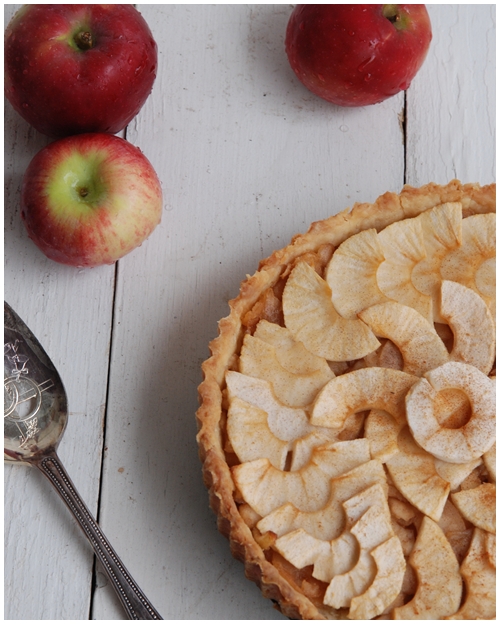
One variation of apple pie is the Apple Tart, made with a single bottom crust and topped with fresh apples. This recipe combines the classic flavors of apple pie with a unique twist for a delightful dessert. Whether you're celebrating fall or just love a classic apple treat, this Apple Tart is sure to become a family favorite.

According to Linda Stradley, on the website What's Cooking America, one of the first records of apple pie was in a cookbook originally compiled around 1390 A.D. by the master cooks of King Richard II. The following, according to historians, is one of the first recipes of what we know today as apple pie.
XXIII. For To Make Tartys in Applis
Tak gode Applys and gode Spryeis and Figys and reyfons and Perys and wan they are wel ybrayed co-lourd wyth Safron wel and do yt in a cofyn and do yt forth to bake well.


These early pies differed from pies today in that no sugar was used – for obvious reasons. Sugar was both scarce and expensive. Also, the pastry, referred to as a “coffin” in the ancient recipe, was considered simply a container, something not to be eaten.

It was said that the mark of a good “coffin” was if it could be run over by a wagon wheel without breaking!

Apple trees were brought to America from Europe. The only apple trees native to North America are varieties of crab apple trees. However, the acceptance of apples in American culture is demonstrated by the well-known slogan:
“As American as motherhood and apple pie.”
Today, the mark of a good apple pie is its tender, flaky crust and the shortest possible period of time between the picking of the apple and the baking of the pie. It has become a family tradition at our house to pick our own apples in the fall. At Thanksgiving this year, we made pies with apples that had been at the orchard as recently as the day before we made the pies.

Recipe: Apple Tart

An apple pie is often made with a double crust. This time we used only a bottom crust, making it an Apple Tart.

Serves: 8

Ingredients:

Dough:
200 g flour (about 1½ cups)
100 g butter, unsalted, and broken into pieces (about 7 tablespoons)
70 g confectioners' sugar (about 1/3 cup)
5 g salt (about 1 teaspoon)
4 ml milk (about 1 teaspoon)
3 egg yolks
5 ml pure vanilla extract (1 teaspoon)

700 g apples (about 3 cups)

Compote:
500 g apples (about 2 cups)
50 g sugar, optional (3½ tablespoons)
50 g butter (3½ tablespoons)
cinnamon, to taste
Instructions:

For the dough:

  1. Sift the flour onto your countertop and make a well in the center. Add butter, confectioners' sugar, salt, milk, egg yolks, and vanilla extract to the well.
  2. Mix ingredients using your finger in a circular motion until a paste forms. Then, use a pastry scraper to break up the dough into a crumbly mixture.
  3. Perform the "fraisage" technique by rubbing a small portion of dough through your palms to distribute the butter and flour without overworking the dough. Repeat this with the remaining dough.
  4. Knead the dough into a ball and ensure a spring-back effect when pressed. If the dough is too dry, add a little water; if too wet, add flour.
  5. Shape the dough into a disc, wrap in plastic, and refrigerate for about 30 minutes.

For the filling:

  1. Core, quarter, and slice the apples. In a pan, melt the butter and add the apples.
  2. Add sugar (optional) and cook until the apples soften. Stir in vanilla extract and cook until the apples are tender, adding water if needed.
  3. Pass the mixture through a food mill or use a food processor to puree into a compote.

Assembly and Baking:

  1. Preheat the oven to 350°F (175°C).
  2. Roll out the dough on a floured surface and line a tart pan or ring. Chill the dough while preparing the filling.
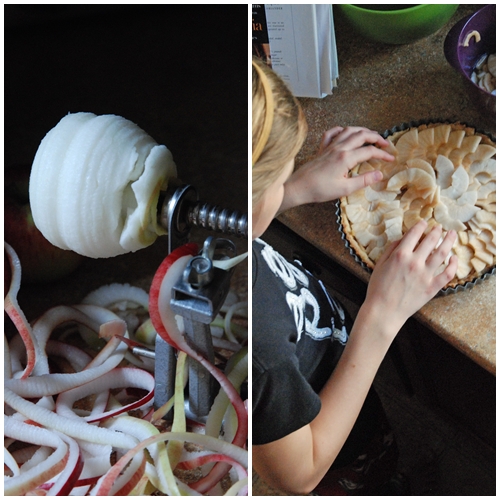
  3. Spread the compote onto the bottom of the pastry. Arrange the remaining apple slices in a circular pattern on top.
  4. Sprinkle with sugar and bake for 30 to 40 minutes or until the tart is golden and the apples are soft.


Tasting Notes
My 11-year-old loves to help make pie and she does it now with minimal supervision. We all love it when she gets into her pie-making mood. The only thing better than the taste of fresh apple pie is the anticipatory smell of it baking in the oven. This year, the pie came out just in time for the turkey to go in, and the lingering aroma of apple pie spices with a slow-roasting turkey – well, memories are made of this!

More to Explore:



Monday, October 11, 2010

Doodles and Pumpkin Pie


This year for Thanksgiving,
I decided to make a paper tablecloth
that we could all doodle on.
Throughout the day,
we would grab a marker
and doodle
things we were thankful for.

family
health
love
animals
school
peace
flowers
friends
home
cameras
music
Christmas
candy
birds
nail polish!

It was fun
and something I think we'll do not just at Thanksgiving,
but for many upcoming holidays.

My favorite pie is pumpkin. What's yours?


Nothing says fall like a homemade pumpkin pie. This simple yet flavorful recipe combines the richness of pure pumpkin, the warmth of spices like cinnamon and ginger, and the sweetness of maple sugar for a delicious treat. Whether you're hosting a holiday dinner or enjoying a cozy fall evening, this Pumpkin Pie is sure to impress your guests and satisfy your sweet tooth.

Recipe: Pumpkin Pie

Serves: 8

Ingredients:

1 15-ounce can pure pumpkin
1 1/4 cups whipping cream
3/4 cup maple sugar [or use regular sugar plus 1 tablespoon maple syrup]
1/2 teaspoon ground cinnamon
1/4 teaspoon ground ginger
1/4 teaspoon salt
3 large eggs

Instructions:
  1. Preheat your oven to 325°F (165°C).

  2. In a large mixing bowl, whisk together the pumpkin, whipping cream, maple sugar (or regular sugar with maple syrup), cinnamon, ginger, salt, and eggs until smooth and fully combined.

  3. Pour the pumpkin mixture into a pre-baked pie shell.

  4. Bake in the preheated oven for about 1 hour or until a knife inserted into the center comes out clean.

  5. Allow the pie to cool before serving.

Happy Thanksgiving!


More to Explore:


Monday, October 4, 2010

Necks and Leek and Potato Soup

Photo on Left: Reka Nyari's "My Neck" {posted with permission}

I look at necks differently now.

I see necks without scars
And remember when I didn't worry about my health.
When I took it for granted.

I have a scar on my neck.

In the checkout line at the grocery store,
I glance at people's necks
instead of the display of celebrity magazines.

Some are old.
Some are strong.
Some are wrinkly.
Some are taut.

I find myself laughing
with my head back
exposing my neck,
and then embarrassed
and vulnerable
I hide.

I'm searching.
For understanding.
For acceptance.
For a voice.
For life.

Today I wear cancer on my neck.
Someday I'll just wear a scar.


What could be more soothing than a velvety, smooth, deliciously flavoured soup awakening your taste buds and then gliding down your throat to fully satisfy those hunger pangs?

To say that some like it hot may cause one to think of the 1959 Billy Wilder movie of the same name starring Tony Curtis who died last week (September 29, 2010). However, in this case, I’m referring to Leek and Potato Soup, sometimes known as Vichyssoise (vi-shē-swäz), a thick soup made of puréed leeks, potatoes, cream, and water (or sometimes chicken stock). It is traditionally served cold but – some like it hot. I am one of those who prefer my soup hot. But this versatile soup can be served either hot or cold, on its own, or as a sauce over seafood.

The origin of this soup has been debated. It is generally agreed that a French chef born in a town near Vichy in France was the first creator of this soup. French chef Jules Gouffé published a recipe that included potatoes, leeks, chicken stock, and cream in a cookbook entitled Royal Cookery in 1869. In this cookbook, the chef recommended that it be served hot. Another form of this recipe appears even earlier under the name Potage Parmentier, after a man named Antoine Auguste Parmentier who returned from a German prison-of-war camp after the Seven Year War (1756-1763) and, noting the sad plight of his people, set up potato soup kitchens in the city of Paris to feed the poor.

This soup became popularized in America, at the Ritz Carlton Hotel in New York City. Louis Diat was a chef at this hotel for the first half of the 20th century.

"In the summer of 1917, when I had been at the Ritz seven years, I reflected upon the potato-and-leek soup of my childhood, which my mother and grandmother used to make. I recalled how, during the summer, my older brother and I used to cool it off by pouring in cold milk, and how delicious it was. I resolved to make something of the sort for the patrons of the Ritz."
- Diat in the New Yorker magazine (1950)

The article goes on to say that the soup was first called crème vichyssoise glacée but when the restaurant’s menu changed from French to English in 1930, Diat named his invention after Vichy, a town near his home in France.

Tips
• It’s important to clean the leeks thoroughly. Since they are covered in sandy soil as they grow, sand can easily get embedded into the leek. Gritty sand is not a pleasing addition to this smooth soup so be sure to take the time to wash the leeks very carefully.

• Do not overcook the leeks since that will cause them to lose their brilliant, green color.

At Le Cordon Bleu
For one of the practicals at Le Cordon Bleu, we had to make Potage Julienne d'Arblay, a version of this classic leek and potato soup. The hardest part of this practical was cutting the carrots, turnips, and leeks into julienne. The length of my turnips was shorter than my carrots, so I lost marks on that. As well, I over-salted my soup. And I sautéed my croutons in too much clarified butter so when I presented my dish to the chef, he pressed a crouton in his fingers and showed me all the butter left on his hands. I thought that the more butter, the better!

Recipe: Leek and Potato Soup

Serves: 6


Ingredients:

30 g butter
150 g leeks, white parts only
500 g potatoes
750 ml water
Salt

Garnish:
50 g carrots
50 g turnips
50 g leeks, white parts only
50 g butter plus 50 g clarified butter

Finishing:
3 branches chervil (you could use parsley)
50 ml cream
50 g white bread slices

Instructions:

  1. Clarify Butter: In a bain marie (double boiler), clarify butter.

  2. Prepare the Leeks: Clean and slice the leeks into ½-inch thin slices. Set aside some for the garnish.

  3. Sweat the Leeks: Melt 50 g butter in a large pot and sweat the leeks until translucent, about 2 minutes.

  4. Cook the Potatoes: Peel and chop the potatoes. Add them to the pot with the leeks and add enough water to just cover the potatoes (about 500 ml). Bring to a simmer and cook, adding a pinch of salt.

  5. Prepare the Garnish: Julienne the carrots, turnips, and leeks. Cook each vegetable separately with a little butter, a touch of water, and a dash of salt, covering them while cooking for 1-2 minutes. This technique is called Étuvé. Once cooked, mix all the vegetables together and set aside.

  6. Blend the Soup: When the potatoes are fully cooked (a knife should easily slide in), pass the soup through a food mill to purée. If the soup is too thick, add water to adjust the consistency. Add the cream and heat the soup over low heat. Taste and adjust seasoning as needed.

  7. Strain the Soup: Pour the soup through a fine-mesh strainer (chinois) and cover with plastic wrap to keep warm.

  8. Make the Croutons: Cut the bread into cubes and sauté in clarified butter until golden brown. Drain on paper towels.

  9. Serve: Ladle the soup into bowls, and garnish with the cooked vegetables, croutons, and fresh chervil (or parsley).
Tasting Notes
This soup, with its few ingredients, offers a surprising depth of flavor. While the original recipe is simple, it can be adapted with ingredients like bacon, garlic, or curry for an added twist. Just remember—don’t over-salt the soup! When prepared correctly, Leek and Potato Soup becomes a comforting classic that’s perfect for any season.

Links
Reka Nyari: website and portfolio
Jan von Holleben: portfolio of necks

More to Explore:


Monday, September 27, 2010

Train Tracks and Chocolate Chip Cookies

a photo taken from my train ride to Montreal this weekend
-- using my new iPhone 4 --
this photo reminds me that life moves forward,
and it may not be perfect, but there's beauty in it


I got some bad news this week.
I have to repeat my surgery since they didn't get all the thyroid tissue the first time.
For some as yet unknown reason, all the thyroid tissue wasn't removed.
There is still a large enough portion that they need to remove
before proceeding with the radiation treatment.
The good news is I can drive again and eat whatever I want.

After telling my girls about this next step, we all went out to balance on the train tracks.
My oldest said on the way that she's not usually unsure about things, but she was about this
...trespassing on active tracks and all...
but we had lots of laughs.
We did races,
choo choo trains,
tried to see how long we could balance.
It's a good memory.

So are all the warm wishes and inspiring quotes from friends
on Twitter and Facebook.
Thank you.

"The rose is fairest when it is budding new, and hope is brightest when it dawns from fears."
- Walter Scott @hornedfroggy

"Yesterday is History. Tomorrow is Mystery. Today is a Gift. That's why we call it the Present." @AMWATERS

"Life is tenacious; it is endowed with the power to heal. The decision to undertake this battle arises from within."
- Ikeda @michaelsdolce

"What would life be if we had no courage to attempt anything?"
- Vincent van Gogh @cailinash

"Healing takes courage, and we all have courage, even if we have to dig a little to find it."
- Tori Amos @DragonsKitchen

"Not everything happens for a reason, but there is a reason for everything."
@foodwishes

"One must still have chaos in oneself to be able to give birth to a dancing star."
- Nietzsche (Lynda on iPhone)

"Fear can keep us up all night long, but faith makes one fine pillow."
- Teresa on Facebook

"Keep on going, and the chances are that you will stumble on something, perhaps when you are least expecting it. I never heard of anyone ever stumbling on something sitting down."
- Charles F. Kettering (Kelly from Facebook)

"If you're going through hell, keep going."
- Winston Churchill (Sandy and Melanie on Facebook)

"Life can only be understood backwards, but it must be lived forward."
- Soren Kierkegaard (an email from someone last week)


The sterotypical comfort food has always been cookies and milk; cookies fresh from the oven milk straight from the fridge. So goes the myth: you arrive home from school, heavy with the burden of strict teachers and challenging school situations and there is Mom, waiting for you with cookies and milk, and as you eat the cookies, you spill out the problems of the day, and the world begins to look brighter.
Apparently there was a time Before Chocolate Chip Cookies (BCCC), though it’s hard to imagine it.

That BCCC time was prior to 1933, which was the year Ruth Graves Wakefield, who owned the Toll House Inn in Whitman, Massachusettes, was making chocolate cookies when she realized she had run out of regular baker’s chocolate. Not wanting to leave her customers wanting, she substituted broken pieces of semi-sweet chocolate from Nestlé, thinking that this chocolate would simply melt and mix into the batter as the baker’s chocolate had. However, to her surprise, the chocolate did not melt and what came out of the oven were the world’s first ever chocolate chip cookies. Her customers were delighted and asked for more. The love affair with CCC had begun. Wakefield sold the recipe to Nestlé in exchange for a lifetime supply of chocolate chips.

The cookies gained popularity during World War II when GIs from Massachusettes, who were stationed overseas, received care packages from home which included CC cookies. They shared these cookies with other GIs from various places around the country and before long Wakefield was inundated with letters from around the world asking for her recipe.

Today, 25% of all cookies baked in the United States are chocolate chip cookies. And out of all the CCC recipes I’ve tried, this one is definitely our favorite.

Recipe: Best Ever Chocolate Chip Cookies (aka Neiman Marcus Chocolate Chip Cookies)

Makes: 112 cookies (This recipe can be halved.)

Ingredients:

2 cups butter
2 cups sugar
2 cups brown sugar
4 eggs
2 teaspoons vanilla
4 cups flour
5 cups blended oatmeal (measure oatmeal and blend in a blender to a fine powder)
1 teaspoon salt
2 teaspoons baking powder
2 teaspoons baking soda
24 ounces chocolate chips
1 8 ounce Hershey bar, grated
3 cups chopped nuts (optional)

Instructions:

  1. Cream the Butter and Sugars: In a large bowl, cream together the butter, sugar, and brown sugar until light and fluffy.

  2. Add Eggs and Vanilla: Add the eggs, one at a time, beating well after each addition. Then stir in the vanilla extract.

  3. Mix Dry Ingredients: In a separate bowl, combine the flour, blended oatmeal, salt, baking powder, and baking soda. Gradually add this dry mixture to the butter mixture, mixing until just combined.

  4. Add the Chocolate and Nuts: Stir in the chocolate chips, grated Hershey bar, and chopped nuts (if using).

  5. Shape the Cookies: Drop rounded spoonfuls of dough onto a greased baking sheet. 

  6. Bake: Bake in a preheated 375°F oven for 8 minutes, or until the edges of the cookies are golden brown. Let the cookies cool on the baking sheet for a few minutes before transferring them to a wire rack to cool completely.

    Optional Freezing: If you want to freeze the dough for later, wrap it in plastic wrap and store it in the freezer. When you're ready to bake, thaw the dough and form the dough into rounds. Bake as directed above.


Tasting Notes
The proof of the pudding (or in this case, the cookies) is in the tasting. This is what two-thirds of my daughters have to say (Anna, my 11 year old, declined to comment since she doesn't like chocolate chip cookies!):
“I like chocolate chip cookies because
when mom takes them out of the oven
the chocolate chips are melted
and the cookie is soft and moist.
Also because they're sweet with chocolate
and well, they're cookies!” ~ Sarah (12 years old)

i like the choclity part
and its fun to eat them to
there really really REALLY good! ~ Jennifer (8 years old)

More to Explore:


Monday, September 20, 2010

Fingerpainting and Strawberry Muffins

When was the last time you did fingerpainting?
On a glass table?
I did that this summer
With a friend
We got messy
First one finger
Then another color on another finger
Until finally our hands were covered in fingerpaint
Drawing with our fingers
Making textures with the paint
Talking about life

This weekend
I poured fingerpaint on my table
And watched my girls paint the table
Getting messy immediately
Not taking their time
All the colors smooshed together
In a moment
And overheard them saying
"I can't wait to tell my friends we painted the table!"
"This is a once-in-a-lifetime event."
No, it's not
We'll definitely do it again

Life can be messy but fun

If you're in the mood for a sweet, fruity treat that combines the freshness of strawberries with a fluffy muffin texture, this strawberry muffin recipe is for you! These muffins are easy to make and perfect for breakfast, snack time, or whenever you want to indulge in a comforting homemade treat. Plus, they're so good that you might have to fight for the last one (as I did with my daughter)!
I'm currently following a strict no-iodine diet as part of the follow-up to my thyroid cancer. In about 10 days, I'll get to take radioactive iodine that should kill off any remaining thyroid cells in my body, and in preparation for that, I'm not allowed to eat certain foods that contain iodine. This includes iodized salt (but kosher salt is fine), cheese, egg yolks, and any pre-packaged foods, among other things.

A friend of my mother's sent me a recipe for banana muffins that she used when her daughter underwent this treatment, and I've modified it slightly. 

Recipe: Strawberry Muffins

Makes: 1 dozen

Ingredients:

½ cup unsalted butter
1 teaspoon vanilla
¾ cup sugar (I used 1/4 cup maple sugar and 1/2 cup raw cane sugar)
3 egg whites
2 cups flour
1 teaspoon baking soda
½ teaspoon kosher salt
1 cup puréed strawberries
coarse maple sugar (optional)

Instructions:

  1. Prepare the Wet Ingredients: In a large mixing bowl, cream together the butter, vanilla extract, and sugar until light and fluffy. Add the egg whites and mix until well incorporated.

  2. Combine the Dry Ingredients: In a separate bowl, sift the flour, baking soda, and kosher salt to ensure even distribution of the dry ingredients.

  3. Mix the Batter: Gradually add the dry ingredients to the wet ingredients, stirring until just combined. Fold in the puréed strawberries to the batter.

  4. Fill the Muffin Cups: Spoon the muffin batter into a prepared muffin tin (lined with paper liners or greased) until each cup is about ¾ full.

  5. Optional: Sprinkle the top of each muffin with a little coarse maple sugar for a slightly caramelized topping.

  6. Bake the Muffins: Bake at 350˚F (175˚C) for about 25 minutes, or until a toothpick inserted into the center comes out clean.

  7. Cool and Enjoy: Let the muffins cool in the tin for a few minutes before transferring to a wire rack to cool completely. Serve warm or at room temperature.

Tasting Notes:
These strawberry muffins are delicious on their own, but you can also add a bit of butter or jam for extra flavor. They're a hit with kids and adults alike, making them a perfect addition to any breakfast spread or afternoon tea!

More to Explore:


Monday, September 13, 2010

Monopoly and Spaghetti

How many hours of Monopoly did you play as a kid? I played it so much I knew all the rents by heart.
My goal: buy everything, mortgage as necessary, win. I can be very competitive. {But I was the shoe in the game pictured!} There's something so fun about playing games, and I'm all about fun right now.

This week I came across a poem that I find very inspiring and have to share it with everyone.


Spaghetti is a beloved, easy-to-make dish that's a hit with families and kids. Whether it's for a quick weeknight dinner or a casual weekend meal, spaghetti is always a winner. The secret lies in a rich, flavorful sauce, and this spaghetti sauce recipe, perfected over the years, is sure to become a family favorite. Plus, it freezes well for a quick meal later on, and you can even use it while camping!

How many people, when thinking of spaghetti, think of that charming scene in the movie “Lady and the Tramp” where Lady and Tramp are both slurping up the same long spaghetti noodle, ending when their lips meet in a slurpy kiss?

Who says spaghetti can’t be fun?

For most families, spaghetti is a kid pleaser and nothing could be simpler to make for dinner. Once you have spaghetti sauce in the freezer, it’s simply a matter of boiling the spaghetti and heating the sauce. And voilà! Dinner is served!

History
The pasta we call spaghetti originally came from China where it was made from either rice flour or hard wheat flour with water and salt added.

Tomatoes, on the other hand, are known to have their origins in the Americas so the first tomato sauce would have been made by the Aztecs. However, when we talk about spaghetti sauce today we are thinking about it as an Italian recipe. In fact, the earliest recipe for spaghetti sauce has been found in a cookbook printed in 1692 by Antonio Latini. Hmmm – that’s 318 years ago! Any food that survives that long has got to have something going for it!

My go-to Spaghetti Sauce recipe has evolved through the years and I release it to you as a favourite from my family to yours.

Recipe: Spaghetti

Serves: 6-8

Ingredients:

1 can of tomato paste
2 fresh tomatoes
1 large can of diced tomatoes
1 jar of pasta sauce (my favorite is Original Ragu)
2 tablespoons oregano
¼ cup chopped, fresh basil
½ cup onions
2 cloves garlic, minced
Salt to taste
Fresh black pepper to taste
5 small cans kidney beans (optional)
½ cup Parmesan cheese, grated

Instructions:

  1. Brown the Onions and Garlic: In a large pot, sauté the onions and garlic until soft and golden.

  2. Add the Tomatoes and Sauce: Add the tomato paste, fresh tomatoes, diced tomatoes, and pasta sauce to the pot. Stir in oregano, basil, salt, and pepper.

  3. Simmer the Sauce: Bring the mixture to a boil. Once boiling, transfer everything to a crockpot or slow cooker. Let the sauce simmer for two hours. This long simmering time is key to developing deep, rich flavors.

  4. Add Kidney Beans (Optional): If desired, add the kidney beans to the sauce and continue simmering for another hour.

  5. Cook the Spaghetti: While the sauce is simmering, cook the spaghetti according to the package instructions. Drain and set aside. 

  6. Serve and Enjoy: Spoon the sauce generously over the cooked spaghetti. Top with freshly grated Parmesan cheese. For an extra indulgent touch, serve with cottage cheese on the side for a "lazy lasagna" feel.

Tips:
  • Simmering is Key: The longer the sauce simmers, the richer and more flavorful it becomes. Make sure to give it the time it needs for the best results.
  • Freezer-Friendly: This sauce freezes well, making it a great meal prep option. Simply store it in containers and pull it out whenever you need a quick, delicious dinner.
And speaking of campfires, how about a song to go with the dinner? This song, sung to the tune of “On Top of Old Smokey” was popularized in 1963 by Tom Glazer and the Do Re Me Children’s Choir.

On Top of Spaghetti

On top of spaghetti,
All covered with cheese,
I lost my poor meatball,
When somebody sneezed.

It rolled off the table,
And on to the floor,
And then my poor meatball,
Rolled out of the door.

It rolled in the garden,
And under a bush,
And then my poor meatball,
Was nothing but mush.

The mush was as tasty
As tasty could be,
And then the next summer,
It grew into a tree.

The tree was all covered,
All covered with moss,
And on it grew meatballs,
And tomato sauce.

So if you eat spaghetti,
All covered with cheese,
Hold on to your meatball,
Whenever you sneeze.

More to Explore:


Monday, September 6, 2010

Bubble Wrap, Cat's Cradle and Vinaigrette


I came home one day after work last week to a parcel from Oliviers & Co. filled with a bottle of Basil Olive Oil, Ketchup, Balsamic vinegar and bubble wrap. The first thing we did was put the bubble wrap on the floor and stomp. There's something so joyful about jumping and so pleasurable about popping bubbles all at the same time. We do this at New Year's every year, but it was fun to do at the end of summer break.

That same night, we found the Cat's Cradle string and taught each other how to pull the x's to make new and magical shapes with a simple line of string.

bubbles pop
hop and giggle
stomp
i'm alive
i feel
i laugh
i'm airborne
flying
soaring
living
jumping


Making your own vinaigrette is quick and easy, and it’s the perfect way to add fresh, personalized flavor to any salad. Homemade vinaigrette can be tailored to your taste preferences, and with the right oil and vinegar, it can elevate a simple salad to something extraordinary. The basic ratio is 2-3 parts oil to 1 part vinegar, and you can customize it with various flavorings.


And always use the best olive oil and the best vinegar. In this case, I was lucky to have a small jug of Basil Olive Oil from Oliviers & Co. that was lightly aromatic and fresh.

Recipe: Vinaigrette

Makes: 1 serving

Ingredients:

¾ teaspoon sherry vinegar (or half red wine vinegar and half cooking sherry)
⅛ teaspoon salt
freshly ground black pepper
2 tablespoons extra virgin olive oil or Basil Olive Oil from Oliviers & Co.


Instructions:

  1. Whisk the Vinegar and Flavorings: In a small bowl, whisk together the vinegar, salt, and freshly ground black pepper.

  2. Add the Olive Oil: Gradually whisk in the olive oil until the vinaigrette is well combined. You can also pop all the ingredients into a Tupperware container and shake well for a quick method.

  3. Taste and Adjust: Taste the vinaigrette and adjust the seasoning if needed. You can add more vinegar for tanginess or more oil for a milder flavor.

What's in My Salad*

Romaine lettuce, torn into bite-sized pieces
carrots, chopped
celery, chopped
broccoli, in florets
cauliflower, in florets
cilantro, chopped
old cheddar, cubed
hot Italian sausage, cooked and sliced
papaya, cubed

* Inspired by a friend who is eating a whole-foods-only diet: no preservatives, no sugar (except for the odd temptation of a Theo chocolate bar), and lots of raw food.


Tips:

  • Use Fresh Ingredients: The fresher the vegetables and olive oil, the better the vinaigrette and salad will taste.
  • Flavor Variations: Feel free to experiment with different types of vinegar such as balsamic or red wine vinegar, and add mustard or honey for an extra layer of flavor.
  • Meal Prep: Make extra vinaigrette to store in the fridge for later use—it keeps well for up to a week.

Links
Virtual Bubble Wrap
How To Do Cat's Cradle
HI + LOW: J-U-M-P

More to Explore:


Monday, August 30, 2010

Fun Dip, Gobstoppers, Poprocks, Froot Loops & Lasagna


When was the last time you ate the candy you loved as a kid?

I picked some up this past week and couldn't believe how fun it was. Yes. Candy is fun. Just try putting some poprocks on your tongue and then make some noise. And then there was the fun dip. Did you know that double-dipping with a foodie is always allowed and sometimes a requirement?

Relish life
with
fun dip
gobstoppers
and
poprocks

Lick and
double-dip
in
pink
purple
orange
sugar

Pop
fizz
crackle
laugh

Taste test
Froot Loops
and
eat the rainbow

Be
loopy.


History of Lasagna

Lasagna, a beloved comfort food, is often associated with Italian cuisine, but its origins are a subject of debate. The term "lasagna" comes from the Greek word lasana (or Lasanon), meaning "trivet" or "stand for a pot," and was later adopted by the Romans as lasanum, meaning "cooking pot." This term was likely used to describe the dish, as the recipe evolved over time. While Italy is now renowned for lasagna, the first recorded recipe appeared in an English cookbook, leading to some disagreement about its true origin.

Despite the debate, lasagna has become a classic in many households around the world. In Canada, it's a particularly cherished dish and is often a go-to recipe for family gatherings, offering comfort and warmth.

Story of Lynda’s Evolving Lasagna

The lasagna recipe that my family loves has its roots in my sister Lynda's experimentation. When she was just 10 years old, she started tweaking the lasagna recipe from the red plaid Betty Crocker cookbook, which our mom often used. Over the years, Lynda honed the recipe and made it her own by adjusting ingredients to enhance the flavors. One key discovery was the importance of using high-quality cheeses, especially mozzarella and Parmesan. We learned this the hard way when our dad once used low-fat mozzarella, resulting in a less-than-ideal lasagna.

Lynda's lasagna is baked at 400˚F for 45 minutes, and then broiled for a few minutes to get the top crispy and golden brown. The recipe can also be made vegetarian by omitting the ground beef.

Recipe: Lynda's Lasagna

Serves: 8

Ingredients:

For the sauce:
1 lb. lean ground beef, browned
½ onion, diced fine
1 small can tomato paste
l large can diced tomatoes
1 tablespoon oregano
Salt and pepper, to taste

For the cottage cheese layer:
1 egg
4 cups cottage cheese

1 package Lasagna noodles

For the topping:
½ cup parmesan cheese, grated
1 lb. mozzarella cheese, grated

Instructions:

  1. Make the Sauce: Brown the ground beef in a pan. Add the diced onion, tomato paste, diced tomatoes, oregano, salt, and pepper. Simmer for 30 minutes, allowing the flavors to blend.

  2. Cook the Noodles: Boil lasagna noodles in salted water for about 8 minutes, or until just tender (al dente). Drain the noodles and set them in cool water to prevent them from sticking together.

  3. Prepare the Cottage Cheese Layer: In a bowl, mix the egg, cottage cheese, and Parmesan cheese together.

  4. Assemble the Lasagna: In a 9" x 13" pan, layer the lasagna starting with noodles. Follow with a layer of sauce, then a layer of the cottage cheese mixture. Repeat the layers: noodles, sauce, cottage cheese, until all ingredients are used.

  5. Top with Cheese: Sprinkle the top layer with mozzarella and Parmesan cheese.

  6. Bake: Bake in a 350˚ to 400˚F oven for 45 minutes to an hour. Then, place under the broiler for a few minutes to make the cheese crunchy and brown.

Tasting Notes
A good lasagna is bubbling and golden on top, with a crispy, cheese-filled finish. After baking, let it rest for 15 minutes to make it easier to cut into perfect squares for serving. Whether you’re serving it at a family dinner or a special occasion, this lasagna is sure to please everyone!

Link
Weird Al Yankovic singing “La La La Lasagna

More to Explore:


Monday, August 23, 2010

Glitter and Borscht


"Have you ever thrown a fistful of glitter in the air?"

I've loved that Pink! song since I saw it on the Grammy's this year.
It still sends shivers when I watch the video.

So, after I learned I had thyroid cancer and before the surgery, I bought some glitter and took it to a field, made a wish and threw a fistful in the air. Then, another evening after telling my three girls about my cancer, we took some more glitter to a field and threw fistfuls in the air and
made our wishes.

It's a good memory.

Blow the dandelion
Toss the glitter
Light a candle
Make a wish
Dream
Hope
Someday I'll be healthy
Someday I'll be happy
...One day...
But today I'll trust life
Breathe
Be
Love
Live


Borscht has a storied history dating back to 1880–1885, with its origin steeped in debate. Both Ukrainians and Russians proudly claim it as a traditional dish from their respective homelands. Regardless of its beginnings, Borscht has become a staple comfort food in many cultures, symbolizing nourishment and warmth.

The name "borscht" is derived from the Slavic word borschevik, meaning "hogweed," a plant that was initially used to color the soup a brownish-green. Modern-day Borscht no longer includes hogweed, evolving instead into a vibrant dish centered around earthy beets and rich stock.

My family's Borscht recipe originates from my paternal great-grandparents, who were of German descent and came from the area historically known as White Russia. This recipe has been passed down through generations and is renowned for its stunning pink hue, achieved by adding whipping cream.The expression “Cheap as Borscht” is an expression used to signify something that is very inexpensive and yet has high value. 

A lively debate always surrounds the choice of stock in Borscht:

    "The flavor is in the stock. You can’t have good Borscht without good stock!"
    "But beef or ham – that is the question."
    "Ach – it has to be ham. It has a rich flavor!"
    "But lots of recipes call for beef stock!"
    "Beef stock? No. Never. It has to be ham. Ham bone. That’s the best."

Ham stock has prevailed in our family tradition, lending its depth to this evolving recipe.

Recipe: Traditional (Evolving) Family Borscht Recipe

Makes: 10 servings

Ingredients:

3 lb. soup bone (beef or ham; we prefer ham)
2-3 cups carrots
16 potatoes (10 diced; 6 cooked and mashed)
1 small head of cabbage
1 large onion
5 large beets, cooked and diced
1 can tomato paste
Fresh dill
2 cups whipping cream (to add to mashed potatoes)
Peppercorns (a handful)
1-3 bay leaves
Fennel, to taste
Salt to taste

Instructions:

1. Simmer the soup bone for an hour or more. Then skim off the fat and add the following:

 • 2-3 cups carrots
• 10 diced potatoes
• ½ of the cabbage (sliced)

Cook until tender.

2. Cook the beets whole in their skins; run beets under cool water and slip the skins off; dice and then add 3 tsp. vinegar and some sugar

3. Sauté the onion.

4. To the onion, add the following:
• the other half of the cabbage
• tomato paste
• can of water (from tomato paste can)

5. Cook 6 potatoes and mash with whipping cream.

6. Put vegetables all together. Add bay leaf and peppercorns and cook for 40 minutes.

7. Add dill and fennel to taste.

8. Season to taste with salt (it may take quite a bit, depending on what soup stock you have used) and a dash of Worcestershire sauce.

9. Serve hot with a dollop of sour cream.

Some claim that Borscht
• is the ultimate cure for a hangover
• prevents the body from aging
• prevents disease

Sounds good to me!
Tasting Notes:
Borscht is at its best when it’s deeply flavorful, with a balance of earthy sweetness from the beets and tanginess from the vinegar. The creaminess from the whipping cream provides a luscious texture, while the sour cream garnish adds a bright, cooling contrast.

 "Have you ever looked fear in the face and said I just don't care?" —Pink!

More to Explore:


Monday, August 16, 2010

Somersaults, Salmon, and Chardonnay

 
Lately, I've decided I need to "try something new" every day.

Last week, I had a water balloon fight with my kids. At one point, I had to be a non-moving target for Jennifer, the youngest, since she was getting frustrated not being able to hit anyone with her water balloons. We had lots of laughs. And I was soaked.
 

Another night, after watching the movie Step Up 3 with my kids, we were walking back to my place, and we were dancing in the parking lot. Anna, my middle child, was laughing, embarrassed by my attempts at dancing. But it was fun. I wouldn't have done that...probably before being diagnosed with cancer. It's funny how it changes you. Jennifer and I jumped on a park bench, leaped from it, and we all skipped, danced and enjoyed lots of giggles and laughter.

Yesterday I did a somersault.

When was the last time I did a somersault?
A head over heels tumble
A heels over head routine
Forwards, backwards, sideways, in the air
In my room
On the grass
In a crowd
360
Dizzy, disoriented, confused
Now
Leap
Jump
Tumble through air
Stick the landing
No more fear
Cartwheel next


This is one of the easiest recipes I've made in a long time. And right now, my life demands easy. With three kids, their activities and camps, work, blog, restaurant reviewing, and all the other stresses on my time, cooking dinner at home lately isn't first on my list. But I'd make this recipe again. My sister sent it to me after she'd made it many times for family and friends. It comes from the July 2006 edition of Gourmet, and it's a keeper.


Recipe for Shrimp or Salmon with Lime Butter Sauce

Recipe for Grilled Corn with Herb Butter


This salmon paired well with Inniskillin's Winemaker's Series 2008 Chardonnay (LCBO/Vintages #105379 $16.95) that was medium-bodied, with a touch of oak but not buttery.

When was the last time you did a somersault or danced in a parking lot?

More to Explore:


Monday, August 9, 2010

Caprèse Salad and Inniskillin's Winemaker's Series 2008 Pinot Gris


Caprèse Salad on the patio of a quaint café called Camille in Le Marais, Paris taken in June 2010 by Shari Goodman

As the story goes, Caprèse Salad was first created in the 1950s in Italy.

So I imagine myself sitting in a little restaurant in Italy, in the region of Campania, perhaps, and before my meal, I order a Caprèse Salad. I know that to prepare this dish, the Chef will pick a top-quality tomato in its prime—ripened on the vine. He will then lift some Mozzarella di bufala (buffalo mozzarella) out of the liquid in the special place he stores it. The buffalo mozzarella will be fresh and springy—even a little juicy and creamy and definitely delicious.

To this, the Chef will add the other simple ingredients, always ensuring that the quality of each individual item is top-notch. The Extra Virgin Olive Oil (or Balsamic vinegar).The fresh basil from the Chef’s own herb garden. Using dried basil from a spice jar would be irreverent. Even the salt the Chef sprinkles on the salad as a final touch is special sea salt.

And so the simple, yet exquisite ingredients come together to create a salad delicious, yet deceiving in its simplicity. The same salad made with lesser ingredients would be ordinary, even mundane. But something magical happens in the fusion of these fine flavours and textures and the salad becomes a dish fit for royalty.

Paired with a medium bodied white wine, somewhat aromatic and fruity, Caprèse Salad is perfection on a summer plate.

I finish my Caprèse Salad, take a sip of wine, and order dinner.

Actually, that's not far from what I experienced in June -- only the location was Paris, not Italy.

I enjoyed a Caprèse Salad on the patio of a quaint café called Camille in Le Marais, Paris. While people-watching and sipping wine, I marveled at the melding of these three perfect elements on my plate. Summer is the perfect time to enjoy this salad when you can get two of the key ingredients from your own garden or the local farmer's market.

Buffalo mozzarella is a type of mozzarella cheese that's made from water buffalo's milk, not from cow's milk. In Ottawa, you can get this cheese at La Bottega Nicastro Fine Food Shop or House of Cheese in the Byward Market.
"Everybody's got a water buffalo
Yours is fast but mine is slow
Oh, where do you get them I don't know
But everyone's got a water buffaloooooo" VeggieTales
When I returned home from Paris, a friend made this simple salad at his cottage using a drizzle of some fine Balsamic vinegar to dress it.


This salad pairs well with a fruity, light sipping wine such as Inniskillin's Winemaker's Series 2008 Pinot Gris (LCBO/Vintages #177766 $19.95) that's barrel aged. With its slightly crisp, tropical tones, it's a perfect afternoon-on-the-patio sipping wine.


Recipe: Caprèse Salad

Serves: 1

Ingredients:

1 fresh tomato
4-5 leaves of Basil
4 oz buffalo mozzarella
Balsamic vinegar

Instructions:

Slice the tomatoes. Slice the mozzarella. Layer the tomatoes, basil and mozzarella. Drizzle with Balsamic vinegar (or make a homemade pesto to drizzle on top). Season with salt and pepper.

More to Explore:


Monday, August 2, 2010

Sesame Salmon


Salmon's journey is extraordinary. It is the story of a fish born in freshwater – a fish that gradually migrates out to the ocean, only to come back again to the freshwater when the time has come to reproduce. It is the story of a species determined to survive, sometimes against incredible odds.

Today, much of the salmon we enjoy comes from Canada, Alaska, the Pacific Northwest, Greenland, and Norway. In Canada, where I live, salmon is readily available and widely popular for its versatility and health benefits.

Health Benefits of Salmon
Salmon isn't just delicious; it's a nutritional powerhouse:
    • Salmon is rich in Omega-3, which has many health benefits to its credit, including defensive action against many forms of cancer.
    • Salmon helps to prevent and control high blood pressure, offering protection against heart attacks and strokes.
    • Salmon is an excellent source of protein.
    • Salmon is rich in nutrients but low in calories.
    What’s not to like about all of that?

    The Secret to Flavorful Salmon: Sesame

    I’ve always known that salmon is one of those healthy foods that everyone ought to eat regularly. But for me, it is important that food also tastes good. Fortunately, I’ve discovered some techniques that make salmon taste so good you’d think it was bad for you. See Saumon au Champagne (Salmon in Champagne Sauce) and Truite de Mer, Sauce Verte (whole poached salmon trout with herbed mayonnaise). Then, there is the sesame salmon recipe, which has been a family favorite for some time now.

    The magic ingredient in this recipe is the sesame seeds, which give the salmon an exotic, nutty, and slightly Asian flavour. They are a good source of calcium and protein and are often used in both sweet and savoury dishes from Japan, China, the Middle East, South America, Africa, and Asia.

    Recipe: Sesame Salmon

    Serves: 4

    Ingredients:

    4 filets of Salmon

    Salmon Marinade:
    Juice of one lemon
    ¼ cup sesame oil
    ¼ cup soy sauce

    Instructions:

    1. Combine the marinade ingredients and marinate the salmon for several hours.
    2. Preheat the oven to 350°F (175°C).
    3. Bake the salmon for about 30 minutes or until it’s tender and fully cooked.
    4. Optional: Sprinkle toasted sesame seeds on top for added crunch.
    Tasting Notes
    The salmon is tender and flaky, the crunchy sesame seeds add an interesting contrast in both taste and texture. This is a recipe to pull out again and again and a pleaser for the whole family.

    More to Explore:
